Beyond the insurance plans, there are additional items that can be setup for insurance
processing, including carriers, employers and specific carrier requirements. These items are
found under the Insurance section of the Setup
menu.
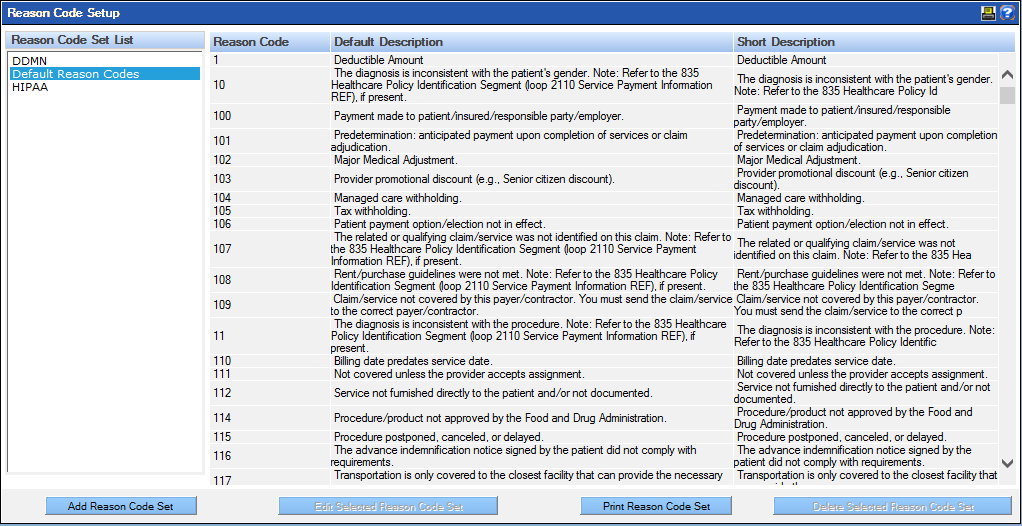
Set Up Reason Codes
The Reason Code Setup tool allows a practice to define and reference the codes sent by
the carrier that identify the reasons for any differences, or adjustments, between the original
provider charge for a claim or service. This setup option is used for customers using the 835
Processing tool.
Launch the Reason Code Setup window by navigating to Setup > Insurance > Reason Code Set.
The current list of carrier reason code sets is displayed on the left side of
the screen and information about the selected code is shown on the right.From this screen,
new profiles may be added, or current ones edited and deleted (based on
permissions).
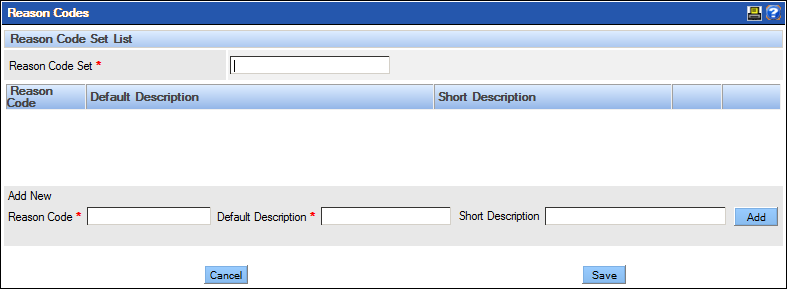
To create a new reason code set, click the Add Reason Code Set
button complete the fields as appropriate.
Note: The set is composed of a number of individual codes that must be added
separately.
To add a Reason Code Set:
Type a name for the set in the Reason Code Set field.
Type the reason code or number in the Reason Code field.
Type the description and information in the Default
Description field. This field contains the full narrative text
associated with the code.There is a 255 character limit.
Type a shorter description with key words if desired in the Short
Description field. This description field is visible to users when
selecting a code from the Reason Code set. There is a 100 character limit.
Click the Add button.
Repeat as needed to create the complete set of Reason Codes.
Click the Save button.
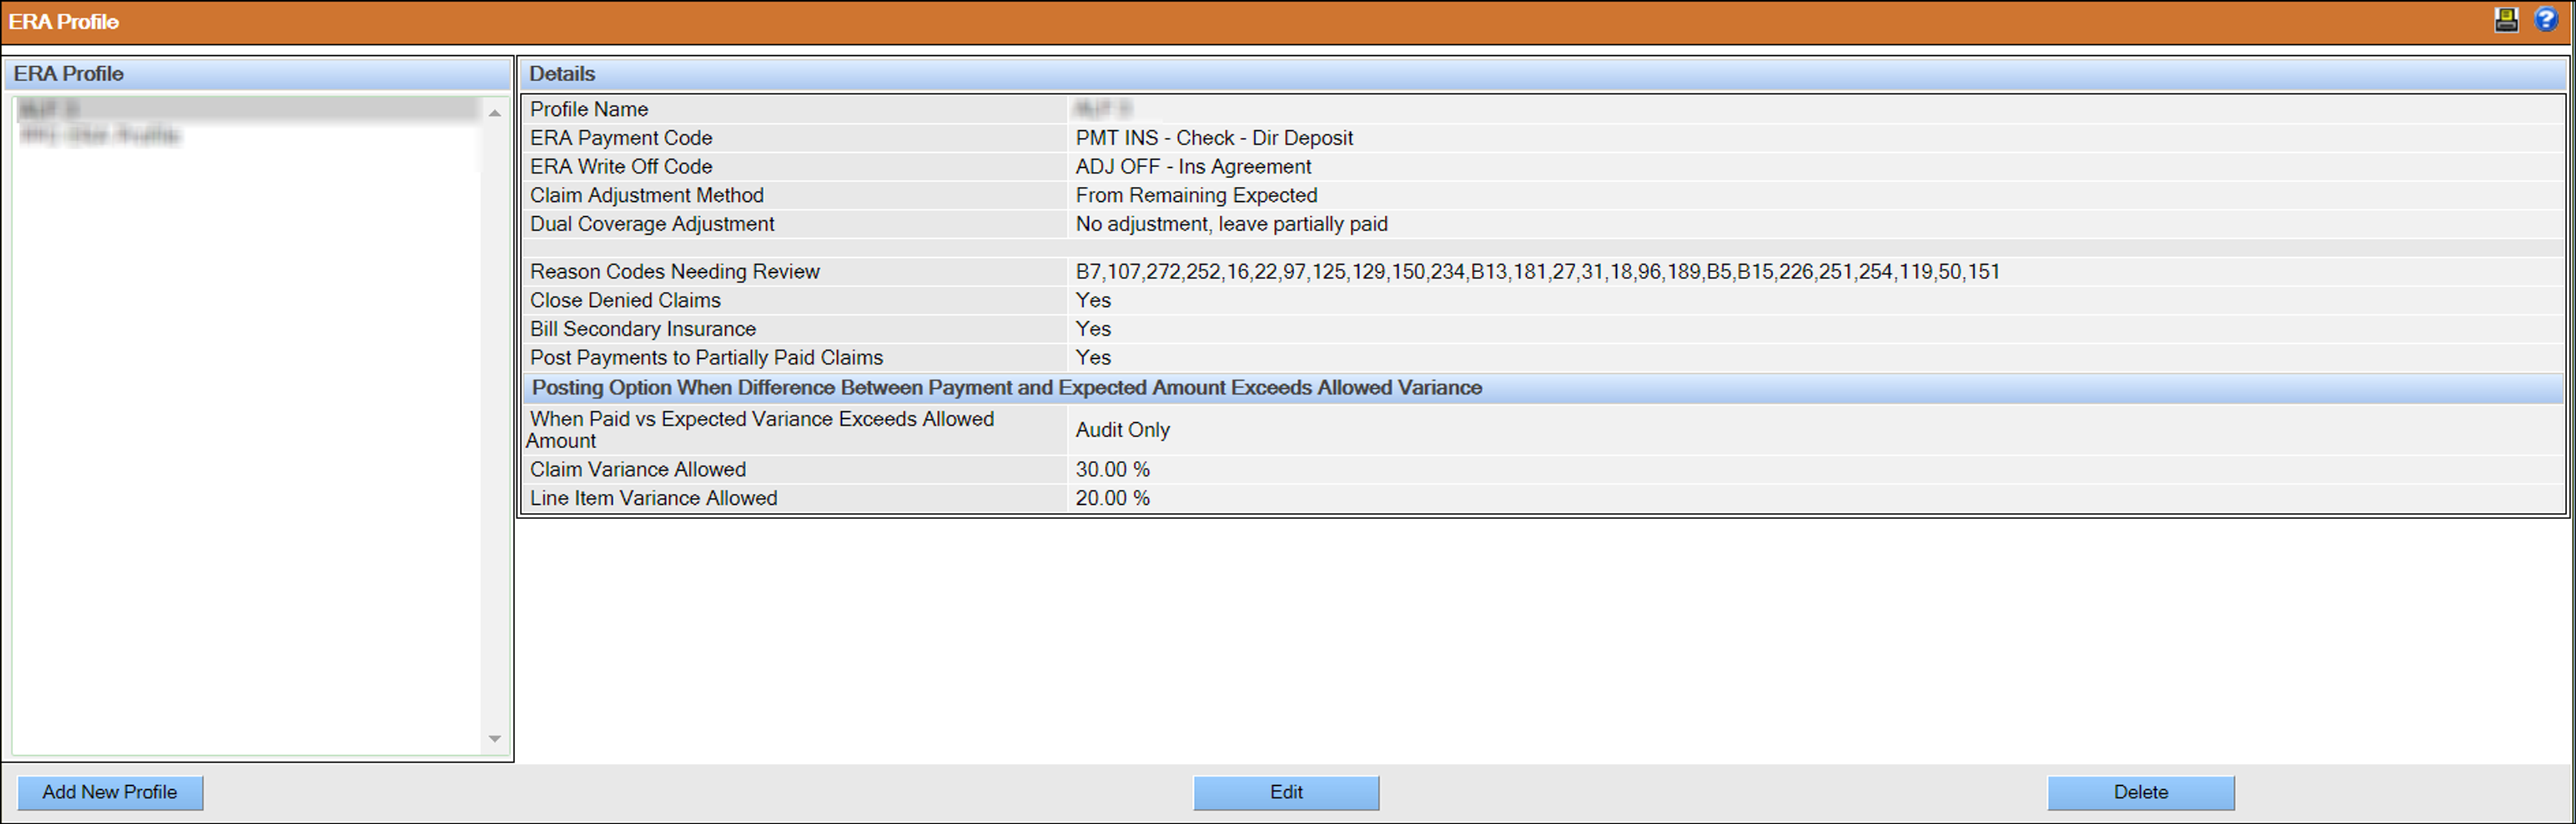
Set Up ERA Profiles
Set up ERA profiles for customers using the 835 processing tool.
The ERA (Electronic Remittance Advice) profile establishes the rule sets and criteria used
when you post payments and adjustments from an ERA file for a specific carrier. You must
establish a profile for each carrier from where the practice receives ERA payments and
communications. This setup option is used for customers using the 835 processing tool.
From the Setup menu, click Insurance > ERA Profile.
The ERA Profile window opens.
Click Add New Profile.
The ERA Profile window displays a form to enter details of
the new profile.For more information on the fields, ERA Profile Form Fields.
Enter values in the fields and click Save.
ERA Profile Form Fields
Description of the fields in the ERA Profile form.
The following table describes the fields on the ERA Profile
window while adding a new profile.
Carrier and Practice Fields
Description
Profile Name
A name, within the 30-character limit, to identify the profile. It
might be helpful to identify the carrier or profile options in the
profile name.
ERA Payment Code
The payment type to indicate how payments are identified in the
ledger and in reports.
Note: Only codes marked as insurance payments
appear in the list.
ERA Write Off Code
The payment or adjustment type to indicate how write offs are
identified in the ledger and in reports.
Note: The payment or adjustment
type must be established with the insurance adjustment class to
appear in the list.
Claim Adjustment Method
You can select one of the following methods to determine when and how
to create write off adjustments.
From File if the amount that is billed to
the insurance company is the same as the amount charged in QDW.
Adjustments are based on the amounts in the EOB and the 835 file
that are listed as Contractual Obligations
(CO). Any amount that does not include the
payment or write off is passed to the patient.
From Remaining Expected if the amount
that is billed to the insurance company is different from the
amount charged in QDW, and the amount that is not paid must not
be passed to the patient. The amount adjusted is the difference
between the amount expected and the amount paid.
Billed vs Allowed to calculate the
adjustment based on the billed and allowed amounts. The billed
amount is from QDW and the allowed amount is from ERA. The
amount adjusted is the difference between the amount billed and
the amount allowed.
Dual Coverage Adjustment
Note: This field is available only for the From Remaining
Expected and Billed vs
Allowed types of claim adjustment methods. This
option pertains to claims that have dual coverage or multi coverage.
You can select one of the following:
Only adjust with final payment to
post write-offs when the final payment is received and not
for any payments before that. For example, if a patient has
primary and secondary insurances, no adjustment is posted
when the primary payment is received. When the secondary
payment is received, the write-off is calculated and
posted.
No adjustment, leave partially paid
to post no adjustment with any payment. The status of the
claim is set to partially paid when the final payment is
received.
Reason Codes Needing Review
The carrier reason codes that cause a partial status to be assigned
to a claim when one or more of the line items on the claim are
denied. Separate multiple codes with commas, for up to 100
characters.
For the From File claim adjustment method, if
a claim contains a reason code from the Reason Codes
Needing Review list with a Contractual
Obligation (CO) group code type, then that
adjustment is not included in the posted write off and is noted on
the Payment Details report, resulting in the
claim being set to a partially paid status.
The list can contain any combination of reason codes, group codes,
and reason and group codes. For example, an entry of 97,PI,PR45
looks for any reason code 97, regardless of the group code, and all
codes with a group code of PI, and only 45 that also have a group
code of PR.
Close Denied Claims
Indicates if the claim must be automatically marked as closed when
the claim is denied.
Bill Secondary Insurance
Indicates if the patient’s secondary insurance must be billed
automatically when the claim is closed.
Post Payments to Partially Paid Claims
Allows additional payments to be posted to claims that have been
partially paid, but not yet closed.
Posting Option When Difference
Between Payment and Expected Amount Exceeds Allowed
Variance
When Paid vs Expected Variance Exceeds Allowed Amount
The threshold variance is the difference between the amount received
in the 835 file and the amount expected from the insurance carrier.
You can set the Claim Variance Allowed field
or the Line Variance Allowed field to adjust
the threshold variance amount in $ or %.
You can select one of the following options for posting payments when
the threshold is more or less than expected.
Audit. To audit the claim for amounts above or
below the allowed variance. The payment is posted, and an
audit message is included in the
Comment field of the posting
report, and the claim is closed.
Partially Pay. To post the claim as partially
paid for amounts above or below the allowed variance. The
payment is posted, and the claim is set to
Partially Pay.
Reject and Audit. To reject and audit claims
which are above and below the allowed variance. The payment
is not posted, and a message is included in the
Comment field of the posting report, and the
claim remains open.
None. To perform no action on the claim.
Claim Variance Allowed $ or %
Sets the threshold variance to be used for the claim. For example, if
the claim variance is set as $25 and if the difference between the paid
amount, and the expected amount is more than $25 or less than $25, then
the claim variance is exceeded.
Line Variance Allowed $ or %
Sets the threshold variance to be used for each line item. For
example, if the line variance is set as 30% and if the difference
between the paid amount, and the expected amount is more than 30%, then
the line variance is exceeded.
Note: While setting the threshold variance, the following points should
be noted:
When using the % option-
If the paid amount is $0 then the allowed variance
is not exceeded regardless of the expected
amount.
If the expected amount is $0 then any payment
greater than $0 will result in the allowed variance
being exceeded. This is not applicable for claims
denied by the carrier.
When using the $ option- If the paid amount is $0 then
claims returned as denied from the carrier do not exceed the
allowed variance.
Insurance: Custom Attachment
The Custom Attachment option allows a practice to customize the
NEA attachment requirements for the automatic NEA attachment feature (NEA activation is
required). The custom attachment process allows a practice to override the standard NEA rules
for attachment requirements by describing the carrier, ADA Code, and attachment type
requirements that should be used in place of the NEA standard. The top third of the screen is
dedicated to searching for attachment requirements that have already been established. This
flexible screen will display any and all requirements based on the selections made in the six
categories. Select the desired criteria (carrier, ADA Code, Attachment type, etc.) from the
desired dropdown list(s) and click the Search button.
Note: Any combination of selections may be made. Be aware however, the more selections
made, narrower the list of results. The middle section of the screen displays search results
based on selection criteria. Only those results that match all the criteria displays. Click
the Edit link to change the attachment requirements for a specific
line item.
The bottom section of the screen is used to set a custom attachment rule.
To
create a new rule:
Select the requirement(s) from the dropdown(s) as needed.
Click the Add button.
Note: The list of available attachment types is based on the setup of document types in
the Misc. Setups section.
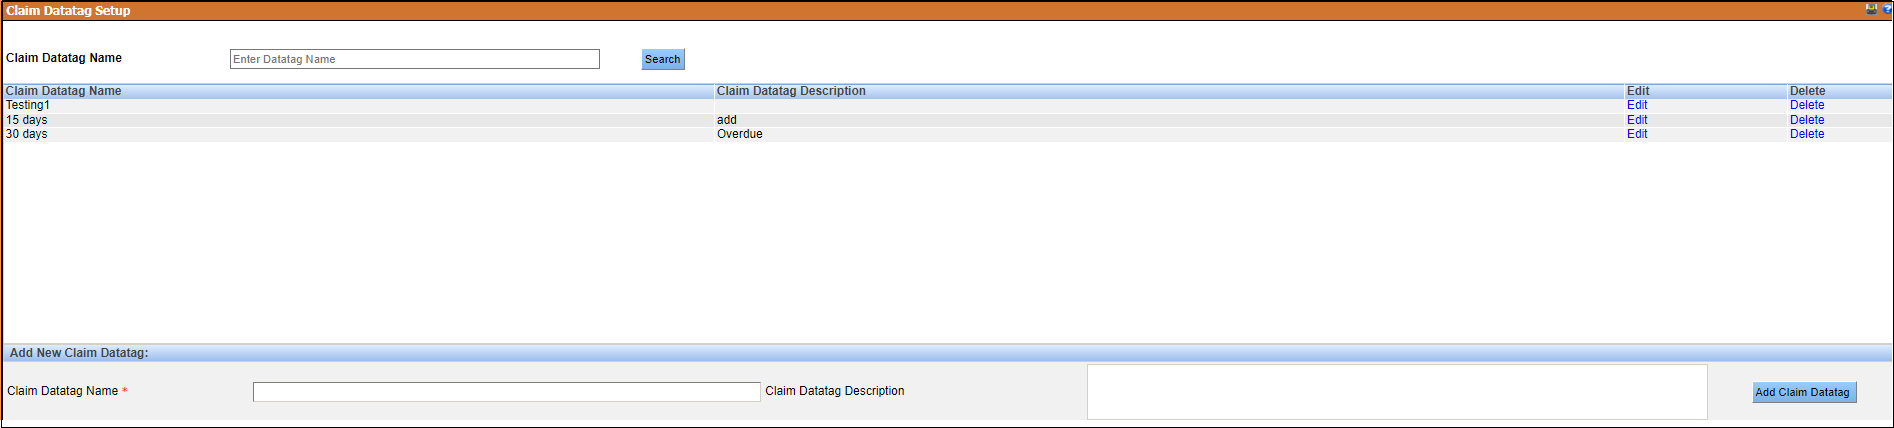
Create New Claim Datatag
A tag is a keyword or term assigned to a piece of information that describes the data
or content that it is assigned to. Claim Datatags enable you to add tags to claims and
create filters based on the tags.
The Claim Datatag Setup window enables you to create datatags
that are useful for your organization. You can sort or filter claims based on the
associated datatag. You can identify the open claims based on the linked
datatags.
To open the Claim Datatag Setup window, click
Setup > Insurance > Claim Datatag.
The Claim Datatag Setup window opens.
In the Add New Claim Datatag section, type the claim
datatag name and description.
Click Add Claim Datatag.
A message appears stating that the claim datatag was added
successfully.
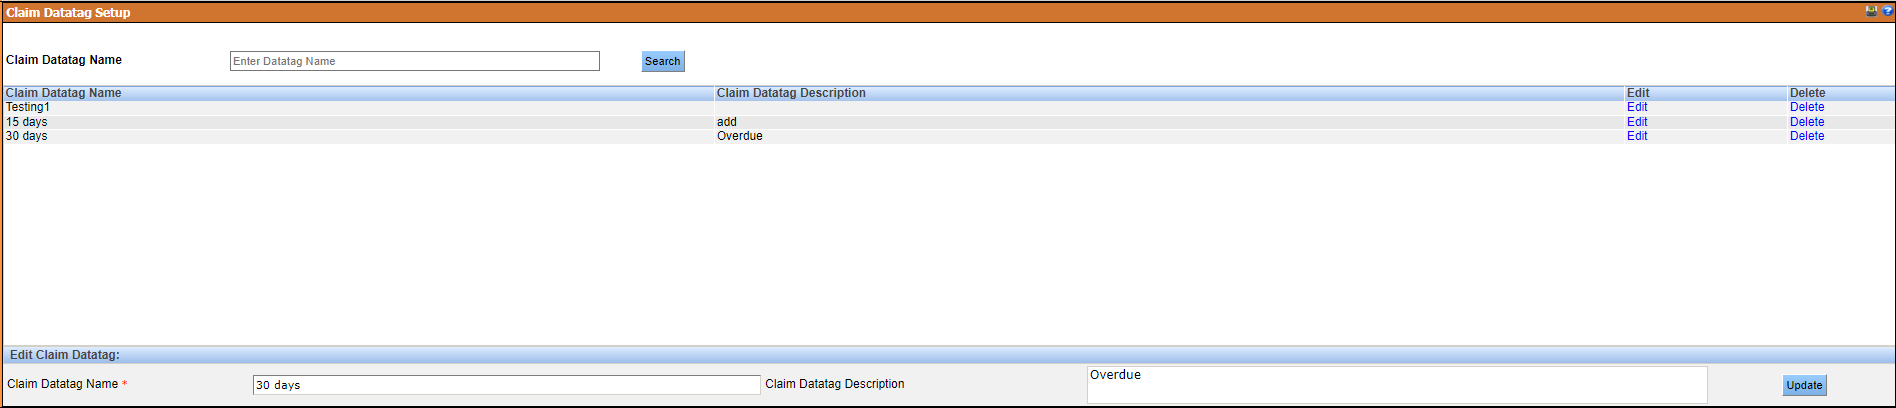
Edit Claim Datatags
You can edit a datatag on the Claim Datatag Setup window.
You cannot edit a datatag associated with an open claim.
To open the Claim Datatag Setup window, click
Setup > Insurance > Claim Datatag.
The Claim Datatag Setup window opens.
Select a datatag and click Edit.
In the Edit Claim Datatag section at the bottom of the
window, make the desired changes.
Click Update.
Delete Claim Datatags
You can delete a datatag from the Claim Datatag Setup window.
You cannot delete a datatag associated with an open
claim.
To open the Claim Datatag Setup window, click
Setup > Insurance > Claim Datatag.
The Claim Datatag Setup window opens.
Select a datatag and click Delete.
A message appears prompting you to confirm the deletion of the
datatag.
Click Ok.
A message appears stating that the claim datatag was deleted
successfully.


 Note: The list of available attachment types is based on the setup of document types in the Misc. Setups section.