Provider Per-Office Settings
Per-office settings allow specific provider selections to be dependent on the selected office.
The information in the Provider per Office Settings Setup window is organized into tabs:
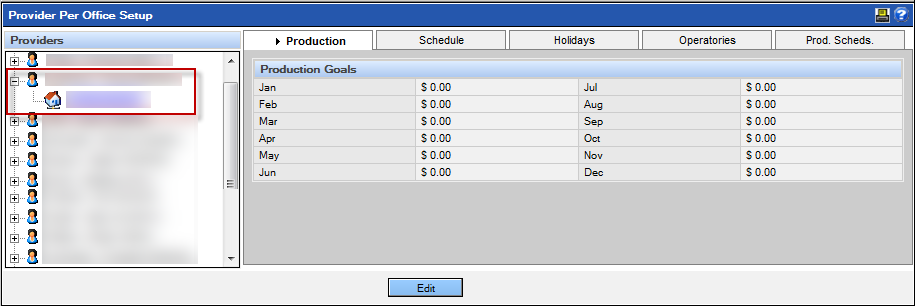
- Production: Monthly production goals for the provider
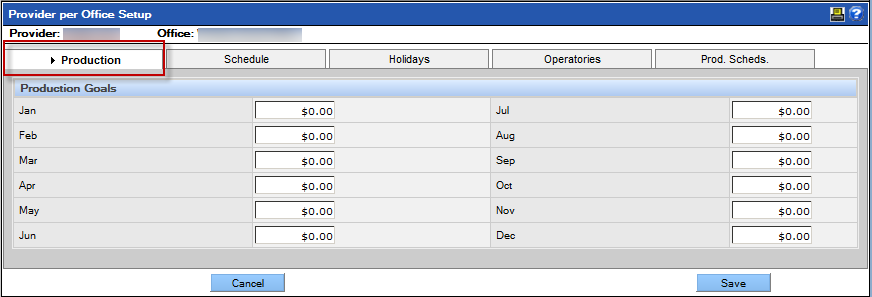
- Schedule: The hours the provider is available for procedures
- Holidays: Holidays specific to the provider which may differ from the office
- Operatories: Operatory assignments
-
Prod. Scheds: Template for the provider’s schedule so that specific
types of production appointments can be scheduled at specific times
Set Provider's Per-Office Settings
These settings must be set for each office the provider visits. Fortunately, there are many opportunities to copy information.
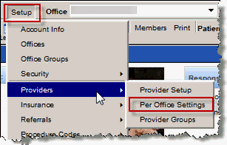
- Navigate to .
- Select the specific office under the Provider’s name.
- Click the Edit button at the bottom of the window.
- Complete the information for each of the five (tabs) as appropriate for the provider.
- Click the Save button when complete.
- Click Yes on the confirmation window.
Set Production Goals
Production goals are are used in reports that compare goals to actual results.
-
Enter the goal in the field for each month.
- Click Save.
Set the Schedule
In this tab, set the schedule the provider will have at this office. Schedules may apply continuously, or may be effective for a specific period. For example, a pediatric dentist might have one schedule when school is in session and a second when school is out for the summer, or a practice could clear a schedule for a dentist to be out on maternity leave.
-
If the provider will have only one schedule at the office, only that one schedule needs
to be set and it will be effective immediately. Simply adjust the times if needed. For
each day the provider will serve at the selected office during this schedule, set the time
for the provider to start for the day, stop for the day, begin a meal break, and end a
meal break.
- Select the hour from the dropdown.
- Select the minutes from the dropdown.
- Select AM or PM from the dropdown.
- If the provider will not be in the office, leave the -- in the field.
-
When complete, click the Save Schedule button.
Note: If the provider needs to have multiple schedules effective at different times, these schedules must be created separately. The schedule will be in effect until the effective date of the next schedule.
To create additional schedules:
Enter Holidays
Set any holidays that will apply to the provider at this office. It is not necessary to add holidays that are already established for the office.
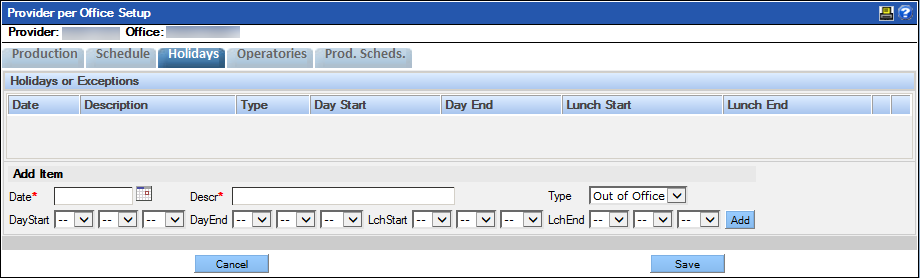
To enter holidays:
- Select the date from the calendar icon.
- Type the description.
- Select the type of holiday – Out of Office,, In Office.
- If the provider will be in the office, use the dropdowns to select alternate hours. If the provider will be out of the office, no hours need to be entered.
- Click the Add button.
- Repeat as needed.
Assign Operatories
On the Operatories tab, you can assign the provider to operatories he or she will use in the office.
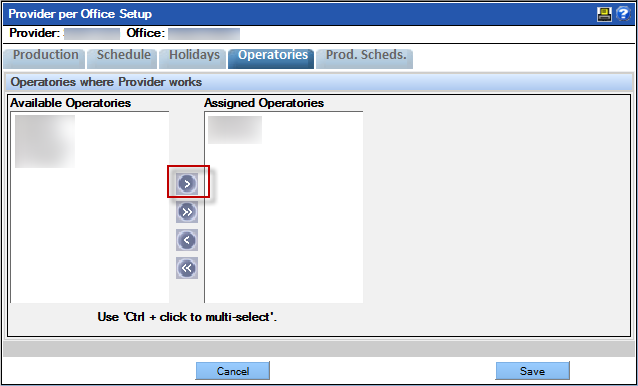
To assign the provider to operatories:
- In the Available Operatories list, select one or more operatories.
-
Click the right arrow to move the selected operatories to the Assigned
Operatories list.
Note: Click the double right arrow to assign the provider to all operatories.
- Click Save.
Set Production Schedules
A provider has the option to create a schedule template by designating specific times of the day or week for specific types of procedures. The template serves as a guide in scheduling but does not limit the time slot to only those procedures.
To set a template production time:
- Select the desired operatory from the dropdown, if required.
-
Click a time slot on the schedule.
Note: Click and drag to set the time and duration.The Add New Category Schedule window displays.
-
In the Add New Category Schedule window, make any necessary
adjustments to the time and duration.
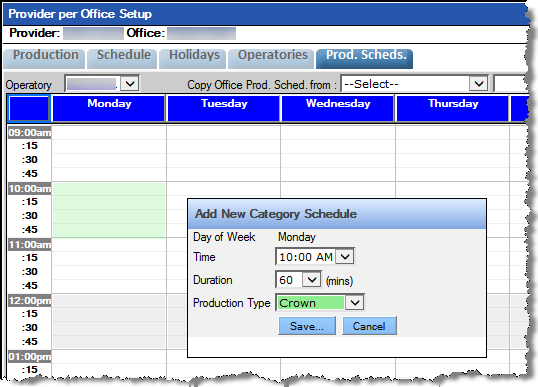
- Select the production type.
- If you have selected the Block as the Production Type, a Notes field appears. If necessary, enter notes explaining the reason for the block time. This field is limited to 120 characters. The note will appear in the block time on the Scheduler.
- Click Save.
- Repeat as desired.