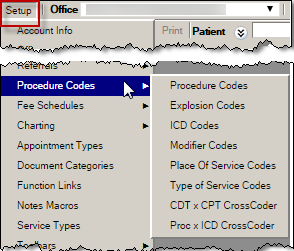
Procedure Codes
Procedure codes are industry-defined codes that identify procedures performed by a medical or dental practice. These codes are used in a number of ways within QSIDental Web.
Procedure Codes Setup
Comprehensive procedure codes are included with QSIDental Web. You may modify this list to accommodate the needs of the practice. Each code can have an associated draw type to allow the treatment to show visually on the chart. You can also add new codes for tracking and record keeping.
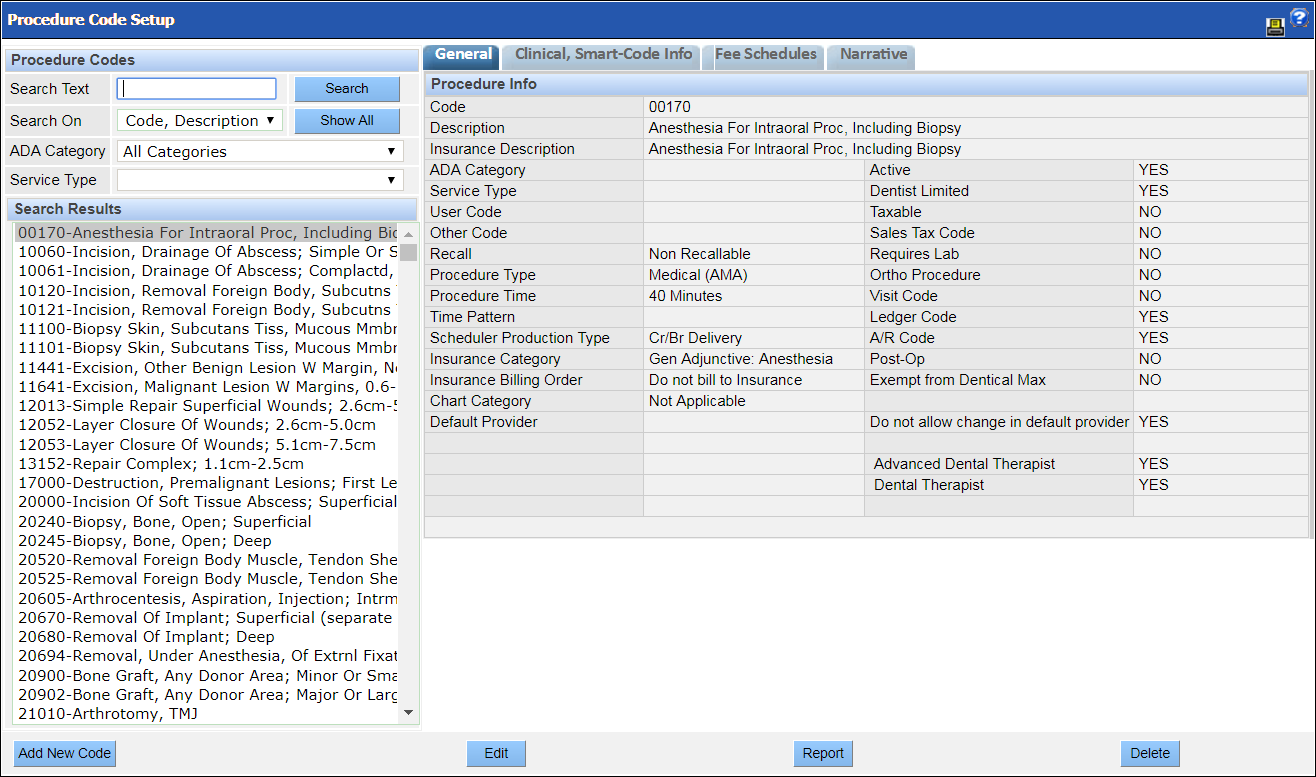
- General: Descriptive details about the code, including name, description and draw type, as well as other settings such as whether or not the procedure is taxable or can be completed by a dental therapist or advanced dental therapist.
- Clinical, Smart-Code Info: Details of connections between the procedure code and the oral cavity, such as tooth numbers and surfaces. Smart codes help reduce errors by validating the selected code compared to the selected teeth and surfaces.
- Fee Schedules: List of the fees for the specific procedure for each fee schedule in which the procedure is included.
- Narrative: Standard details that accompany the NEA attachment for a specific code.
Add a Procedure Code
Many practices create special procedure codes for tracking and reporting purposes. These are called “local" or "dummy" codes.
To add a procedure code:
- Navigate to .
- Click Add New Code.
-
Complete the information for each of the two steps as appropriate using the following topics as a guide:
- Procedure Info: Procedure Info
- Clinical, Smart Code Info: Clinical, Smart Code Info
- Click Save.
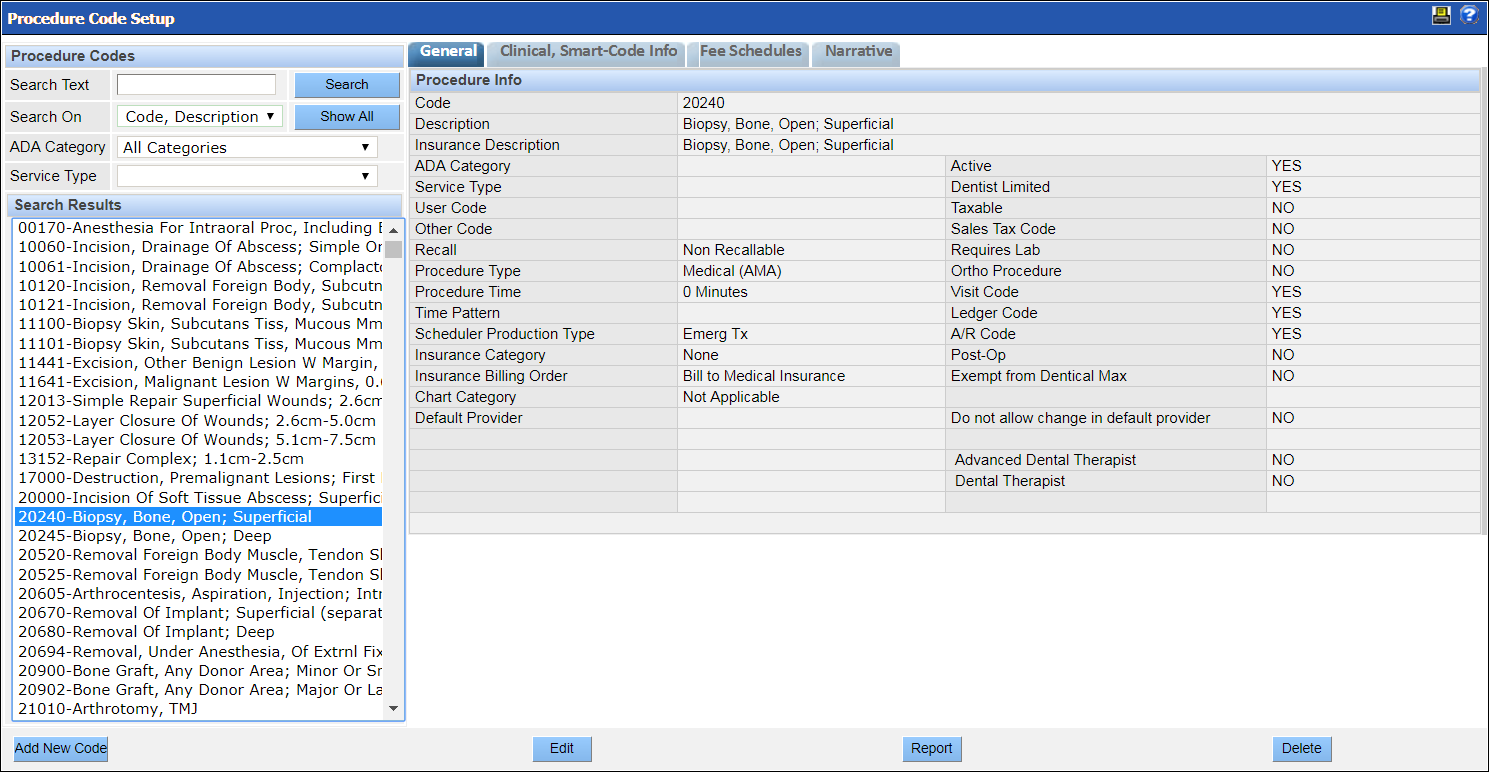
Procedure Info
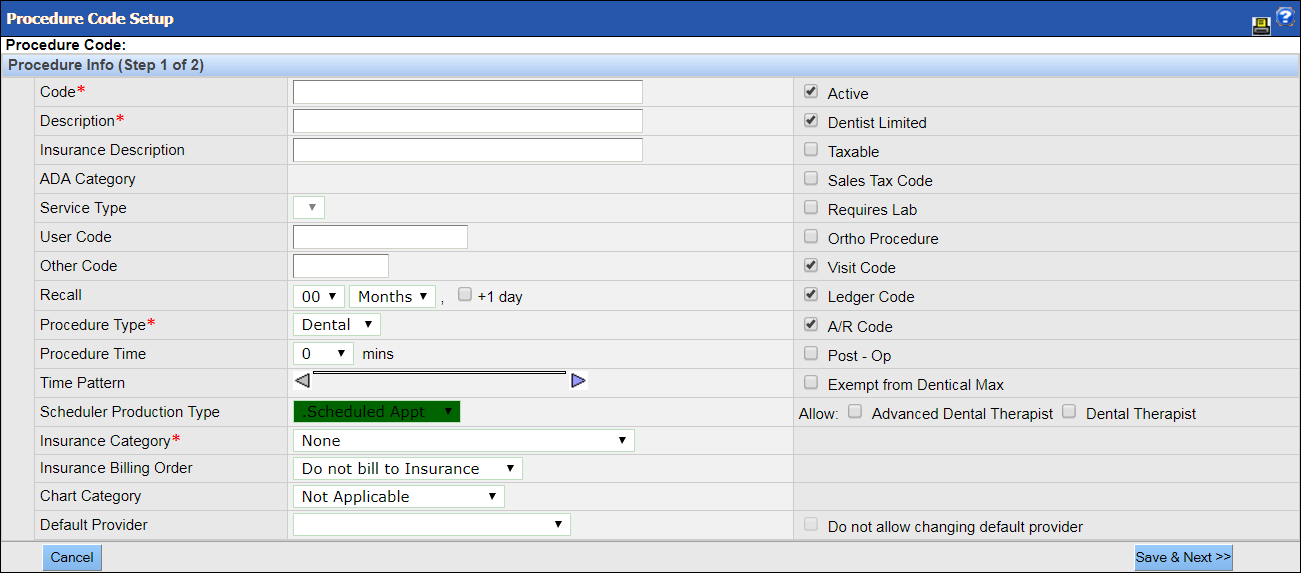
Following are descriptions of the fields on this screen as well as tips on completing them.
|
Procedure Code Setup Fields |
Description |
|---|---|
|
Code |
Type the identifier for the code. Most locally created codes are preceded by a "Z" for quick identification. |
|
Description |
Type a description for the code. The information will be copied to the Insurance Description field. |
|
User/Other Code |
Optional details that distinguish the code and make it easier to locate in a search. |
|
Recall |
If the code represents a recallable procedure, set the recall interval. |
|
Procedure Type |
Select Medical or Dental. This field is required. |
|
Procedure Time/Pattern |
Procedure codes can be associated with a specific amount of time, which can be further segmented into provider time, non-provider time and anesthesia time. These settings apply to the procedure code by default but can be adjusted for individual appointments. |
|
Insurance Category |
Select the category from the dropdown. This field is required. |
|
Insurance Billing Order |
Select the insurance billing order from the dropdown. The selection will apply as a default for the procedure, though it can be changed for individual claims. |
|
Chart Category |
Select the category for the procedure from the dropdown. |
|
Default provider |
If the procedure should always be associated with a specific provider, select him/her from the dropdown. |
|
Check boxes |
The following check boxes enable or disable certain features and codes associated with the procedure. |
|
Check box |
Selecting the check box will: |
|
Active |
Set the procedure code as active and able to be selected and applied. Once a procedure code is used, it cannot be deleted, however, clear the Active box to prevent further use of the code. |
|
Dentist Limited |
Allow the code to only be billed out under a dentist. |
|
Taxable |
Apply sales tax on the amount of the procedure. |
|
Sales Tax Code |
Outdated item, replaced with Taxable. |
|
Requires Lab |
Future feature enhancement |
|
Ortho Procedure |
Sets the procedure as an orthodontic code. |
|
Visit Code |
|
|
Ledger Code |
Allows the procedure to be connected to the Ledger. We recommend that this check box is selected. |
|
A/R Code |
Allows the procedure to be considered in accounts receivable. We recommend that this check box is selected. |
|
Post – Op |
Indicates that the patient needs to receive post-op communication. If you select this check box, the patient will appear on the Post-Op report when the procedure is performed and charted as complete. |
|
Exempt from Dentical Max |
Outdated item. |
|
Allow Advanced Dental Therapist/Dental Therapist |
Allows the procedure to be completed by an advanced dental therapist or dental therapist. |
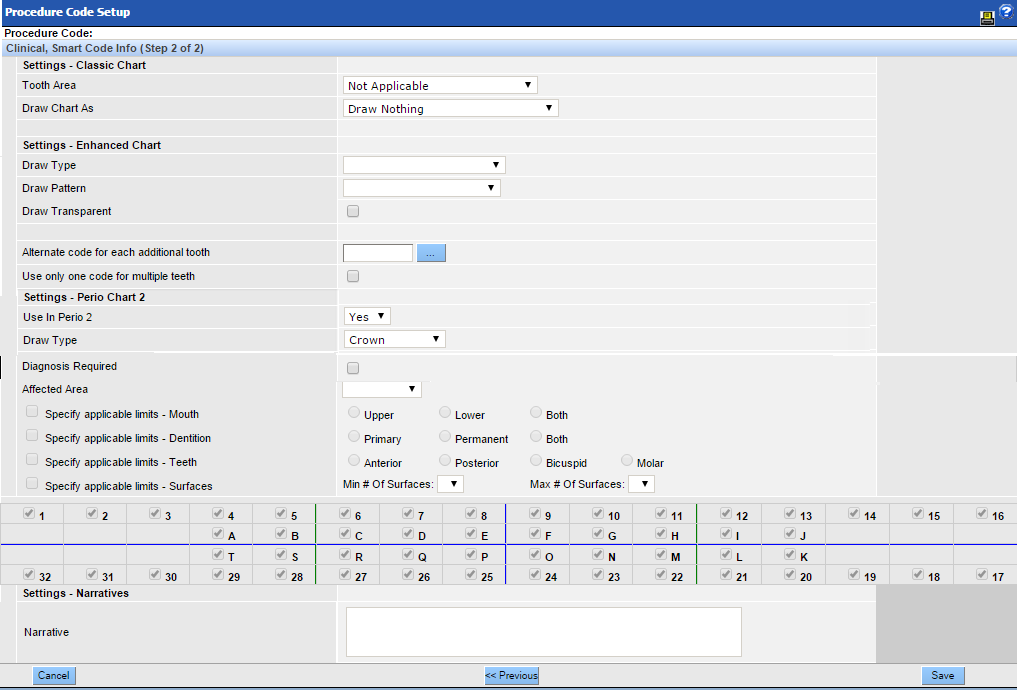
Clinical, Smart Code Info
|
Procedure Code Setup Fields |
Description |
|---|---|
|
Settings – Classic Chart |
The classic chart is no longer used and these settings no longer apply. |
|
Settings Enhanced Chart |
Select the desired options from the dropdown to indicate how the procedure should be drawn on the chart. |
|
Alternate code for each additional tooth |
When multiple teeth are involved in a procedure, sometimes the subsequent teeth are given different procedure codes than the first tooth. Search for and select the code that would be used for additional teeth involved in this procedure. |
|
Use only one code for multiple teeth |
Select this check box to use the code only once regardless of the number of teeth selected. Typically used for procedures involving the full mouth such as hygiene or sealants. |
|
Settings - Perio Chart 2 |
When the Perio 2 chart is enabled, use these settings to indicate that this procedure should be available for adding within the Perio 2 module. Select the desired draw type from the picklist. Options include: Impacted, Extracted/Missing, Crown, and Bridge Pontic. If there are no options in the picklist for the Draw Type field, a Condition or Service code has already been selected for that button in the Perio 2 module. |
|
Diagnosis Required |
Click this checkbox to require the user to enter an ICD code when entering this service into the chart. The Diagnosis Code window will appear automatically for the user. Procedures mapped to ICD codes using the Procedure to ICD crosscoder will display the established codes by default, though any code added into QSIDental Web will be available. |
|
Affected Area |
Selections in this section improve the smart logic, matching the surfaces and teeth
to the specific procedure code.
|
|
Narrative |
Type any description, notes, or details that should automatically appear when the procedure code is associated with an automatic NEA Attachment. This information will appear on the Narrative tab when the code is saved. Please note that the narrative text itself is not visible in QSIDental Web, but the NEA screens will indicate the narrative and it will be included in the transmission. |
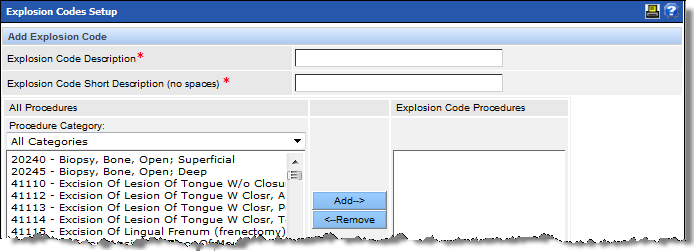
Explosion Codes Setup
Explosion Codes are an efficient way of linking commonly combined procedures; for example, a new patient visit explosion code might include an exam and x-rays. The user can select a single code that then explodes into multiple procedure codes, which is especially useful when the user does not have permissions to the enhanced tooth chart.
The Explosion Code Setup window displays the practice’s current explosion codes with their names and linked procedures.
Explosion codes can be edited and new ones created. Clicking the Edit button adjusts a current code. Clicking the Add New Code button creates a new code. For a new explosion code, providing a name and description will make the code easy to identify.
Procedure Codes: Additional Options
There are additional options for working with procedure codes within QSIDental Web. Work with the project manager if the practice would like more details on the following additional options.
- ICD codes are diagnostic codes used by some practices to track medical diagnosis or problems. Additionally, the codes are used to communicate with some insurance companies for certain types of procedures.
- Modifier, Place of Service, and Type of Service Codes are specialty codes that are most frequently used for oral surgery that must be billed to medical insurance.Please work with the Project Manager when changing these options.
- CDTxCPT and CPTxICD CrossCodes are also used when a procedure has medical and dental components. For a claim to be submitted to both medical and dental carriers, the codes must be mapped to one another.
Enable a Procedure for a Dental Therapist or Advanced Dental Therapist
To allow a procedure to be completed by a dental therapist or advanced dental therapist, you must edit the procedure code.
-
Navigate to .
The Procedure Codes Setup screen displays.
-
Select the procedure code from the list on the left.
The procedure code's details display on the right.
-
Click Edit.
The system displays a screen allowing you to edit the procedure code.
-
Select the Advanced Dental Therapist and Dental
Therapist check boxes as appropriate.
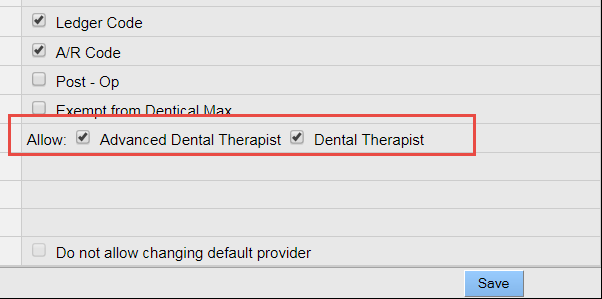
-
Click Save.
Note: Users can now select an advanced dental therapist or dental therapist as the preferred provider when adding the procedure to a treatment plan.