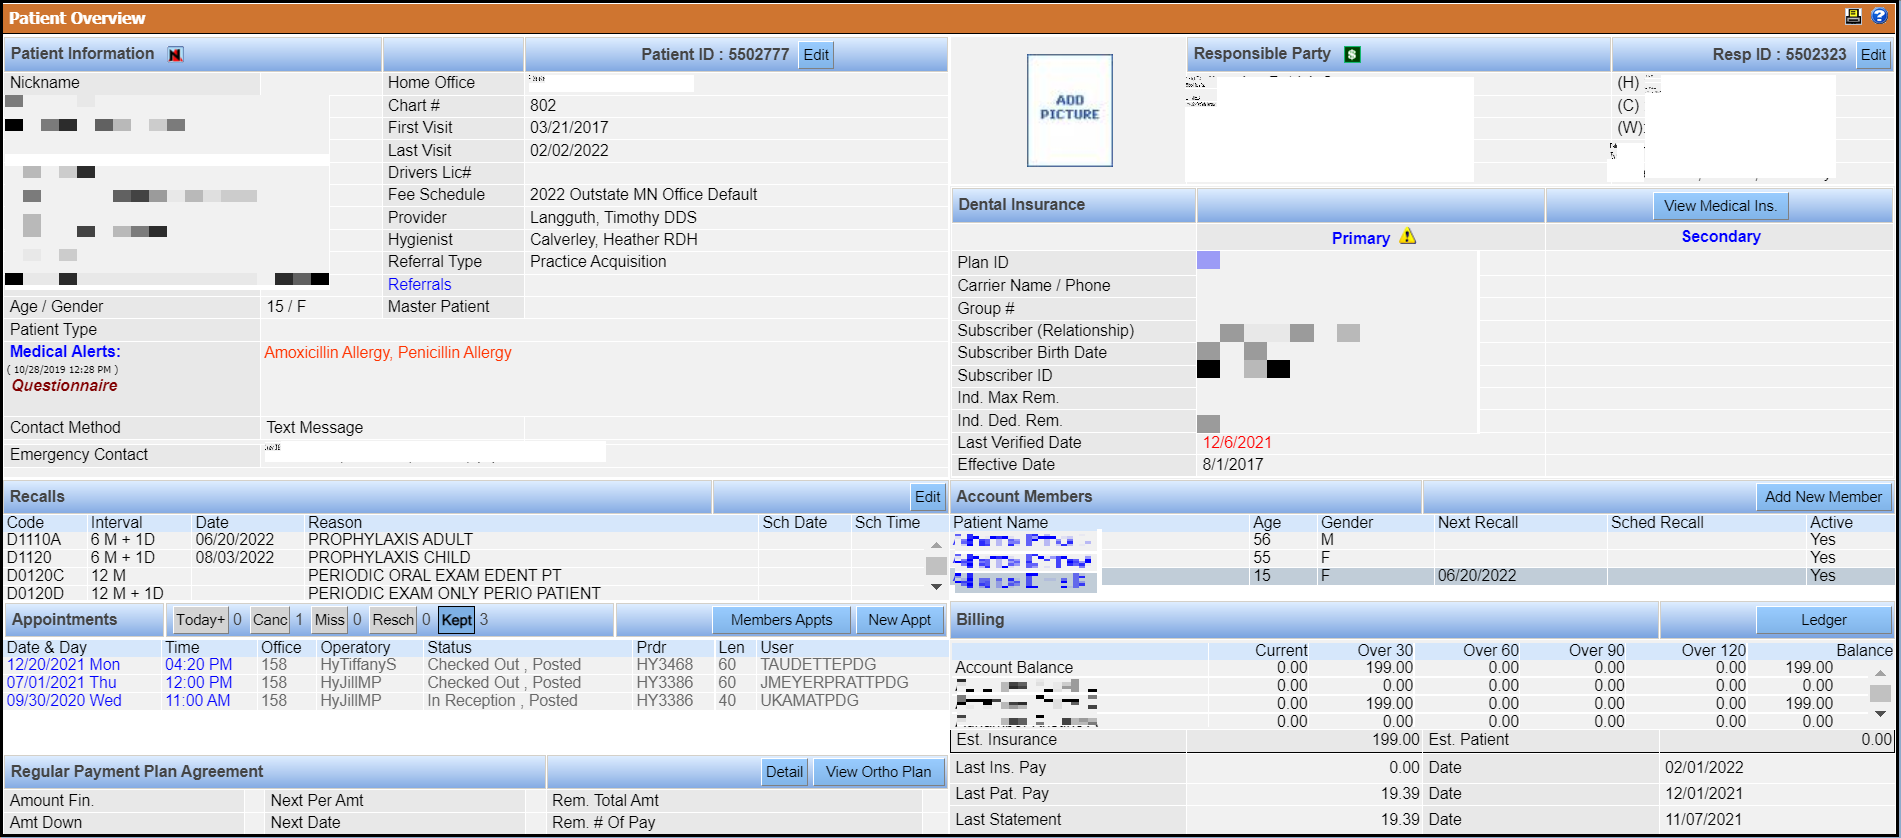
New Appointments
Appointments are most easily created using the Scheduler, as it gives the clearest view of a provider and operatory's availability. A number of features make it easy to add appointments.The Find Slot feature enables an available appointment slot to be located given a patient's specific criteria. When an appointment is created by double-clicking the desired appointment slot, the date and time are automatically included within the appointment, reducing the information that must be added.
If the practice has multiple office locations, always select orconfirm the office for which the appointment is being made using the dropdown.

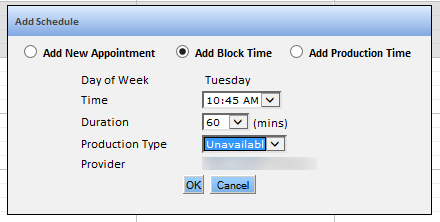
Creating appointments in the QSIDental Web Scheduler is similar to creating appointments in other types of electronic calendar tools.There are several options for launching the appointment tools inside the Scheduler. Additionally, production time (template) and block time may be added.
- Double-click in an available space in the scheduler.:The New Appointment window opens so that a patient may be selected or a new record added.
- Right-click in an available space in the scheduler. The right-click menu opens so that a new item may be added.
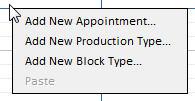
If Add New Appointment is selected, the New Appointment window opens.
- Click and drag to select multiple units.A selection window opens so that the selected new item may be added.
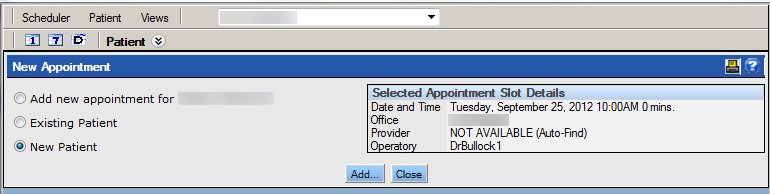
New Appointment Window
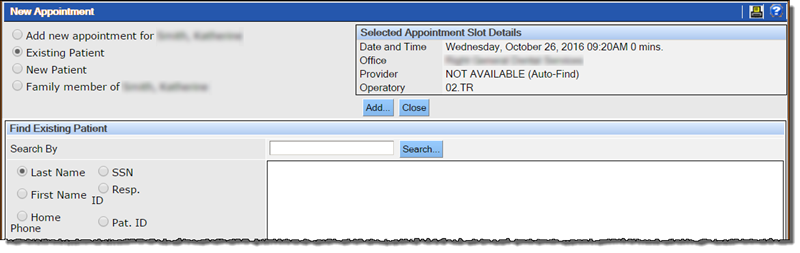
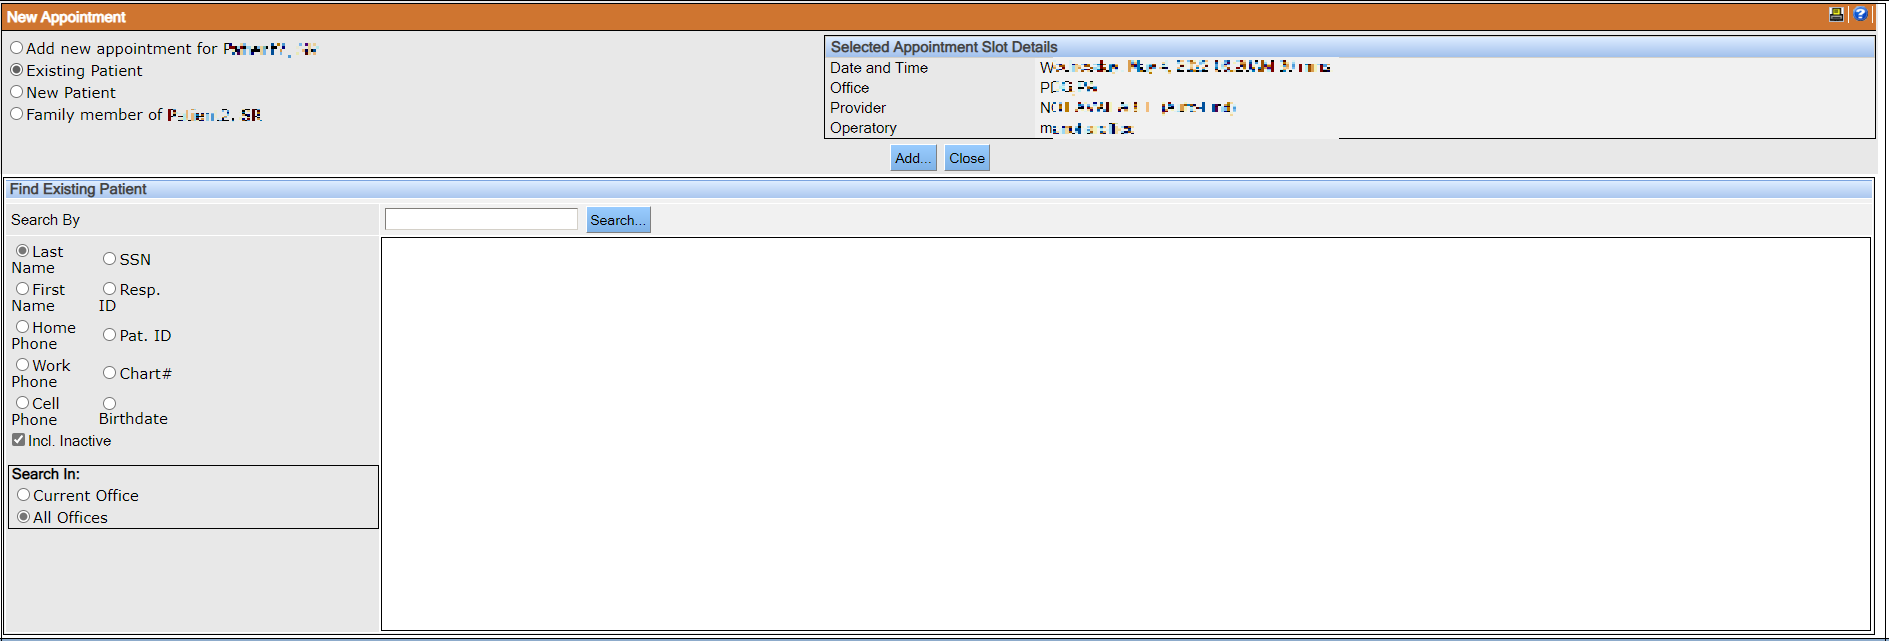
The New Appointment window is the first launching point for an appointment. It gives multiple options for creating an appointment. The radio buttons allow you to create the needed appointment for the desired individual.
The radio button options are as follows:
|
Radio Button |
Meaning |
|---|---|
| Add new appointment for lastname, firstname |
Adds a new appointment for the most recently accessed patient. |
| Existing Patient |
Using the search tools in the lower half of the window; locate a patient whose record already exists in the QSIDental Web database. |
| New Patient |
Add a new appointment for an individual who does not have a patient record at the practice. The appointment is a placeholder and the person is not enrolled as a patient. |
| Family member of lastname, firstname |
Add a new appointment for a family member of the last patient for whom an appointment was scheduled. |
Schedule Appointment for New Patient
Schedule an appointment for a new patient.
You can schedule appointments for new patients (those who have not been set up in QSIDental Web in any office).
-
Open the New Appointment window.

-
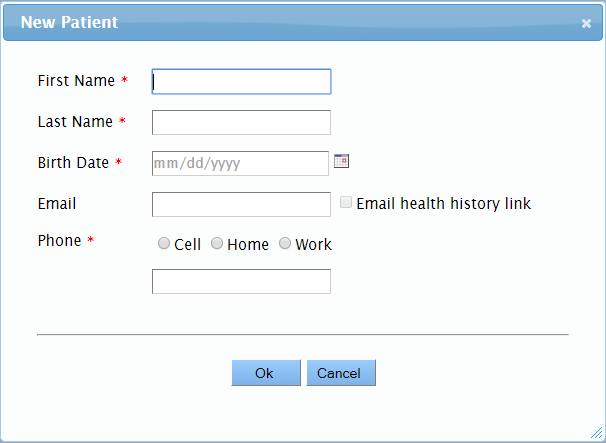
Select New Patient and click Add.
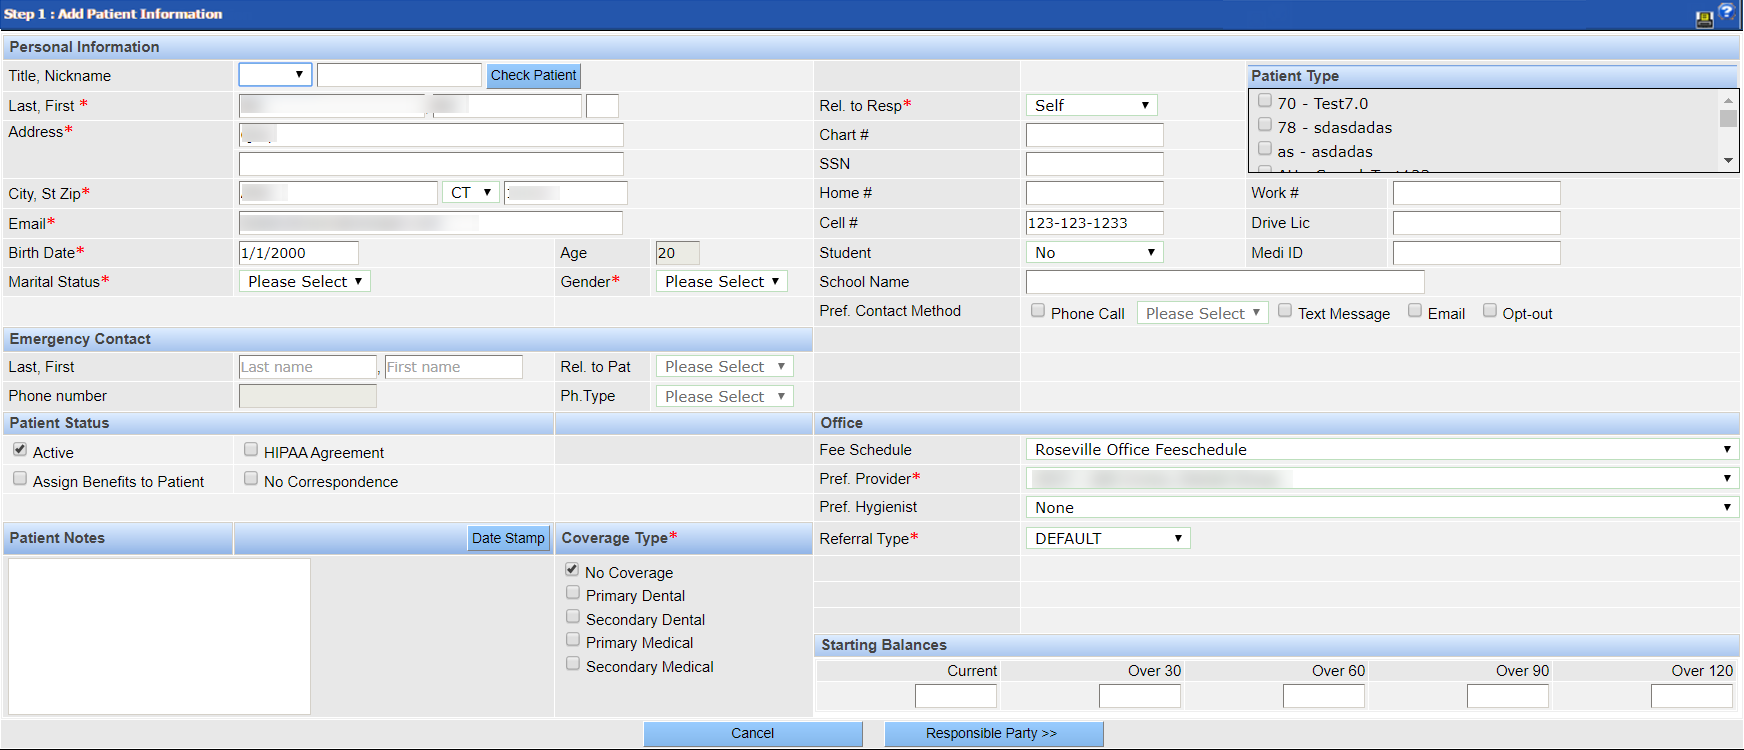
The New Patient window opens.
-
Enter values in all the fields. Select Email health history link
and click Ok.
Note:
- The email health history link option is available only when the Send email health history link option on the Online Registration tab of the Account Setup window is set to Yes.
- If Email health history link is selected, an email is sent to the patient with the online registration and appointment intake forms. The patients can enter their demographic and health history information and submit it.
The Add/Edit Appointment window opens along with the Appointment Intake Form. Some of the fields on the Add/Edit Appointment window display the values entered on the New Patient window.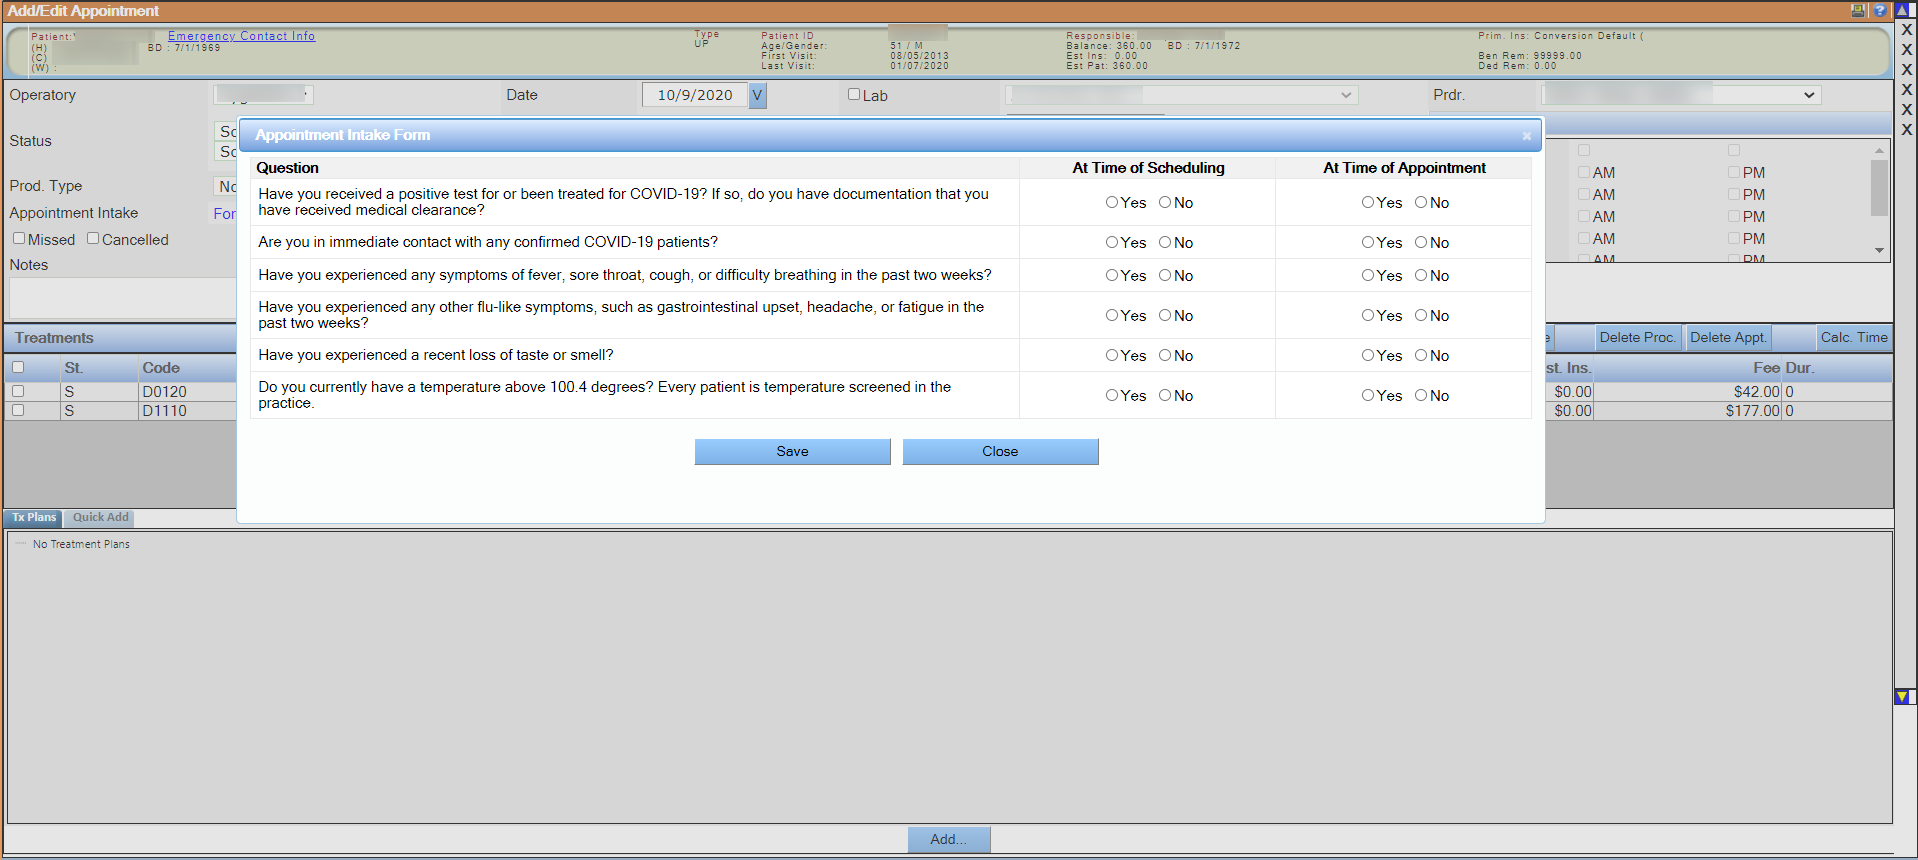
-
If completing the Appointment Intake Form at the time of the
appointment, click Save. You must save the Add/Edit
Appointment window to save the details of the Appointment Intake
Form.
Note:
- If the patient has more than one appointment in a day, then the same Appointment Intake Form is used for all the appointments.
- After an appointment is created for a patient and if the first column of the appointment intake form is filled, then the appointment intake form is displayed on the patient’s chart only on the day of the appointment.
-
If the appointment intake form is not completed, select Email Intake
Form to send an email with the appointment intake form to the patient. The
appointment intake form is sent through the health history link. To send emails to
patients, the health history link must be enabled.
 Note: If E-mail patient when appointment is confirmed and intake form is not filled is selected while creating the appointment intake form, then an email is automatically sent to the patient when the intake form is not filled and the appointment is confirmed.
 - Add the associated treatments if desired. For more information, see Including Treatment Items in an Appointment.
-
Click Save.
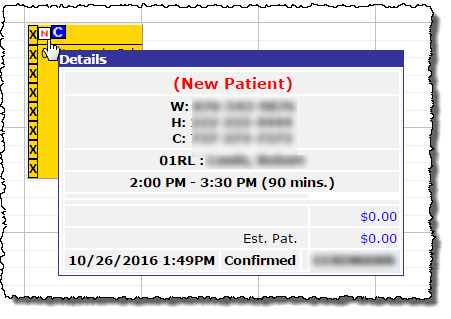
- In the scheduler, the appointment includes a New Patient icon
and the Details window displays New
Patient, both in red.
- An email with the health history link is sent to the patient’s registered email ID.
The patient must log on, enter the patient details and then sign and submit it. When
the online registration form is successfully submitted, the New
Patient icon and New Patient in the
Details window turn green in the scheduler.
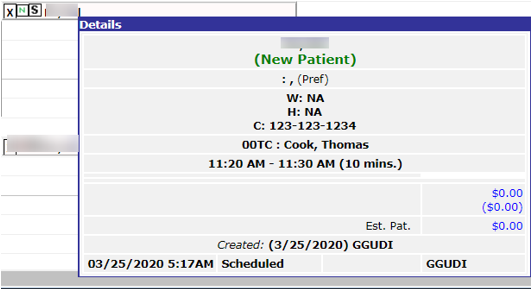
- In the scheduler, the appointment includes a New Patient icon
and the Details window displays New
Patient, both in red.
-
From the Patient menu, select Online Registered
Patients.
The Add Patient window opens displaying the list of all the patients registerred online in the Online Patients section.Note: The Status column indicates whether the registration is complete or incomplete.

-
Select the desired patient and click Add Patient.
The Step 1 : Add Patient Information window opens displaying the values entered in the online registration form.
 Note: When there is more than one appointment for the same patient, you can link appointments on the Matched Appointments window that opens when you click Add Patient. If the patient demographics match, but have different patients, create a new patient by clicking Create New Patient
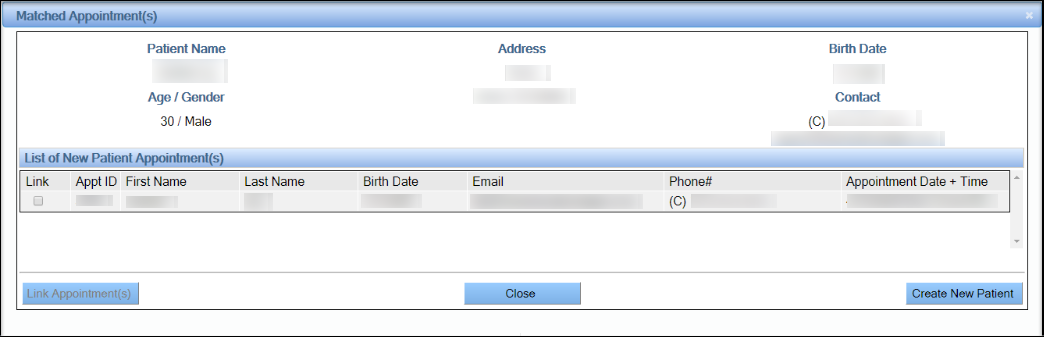
-
Enter values as required and click Responsible Party.
The Step 2 : Add Responsible Party Information window opens.
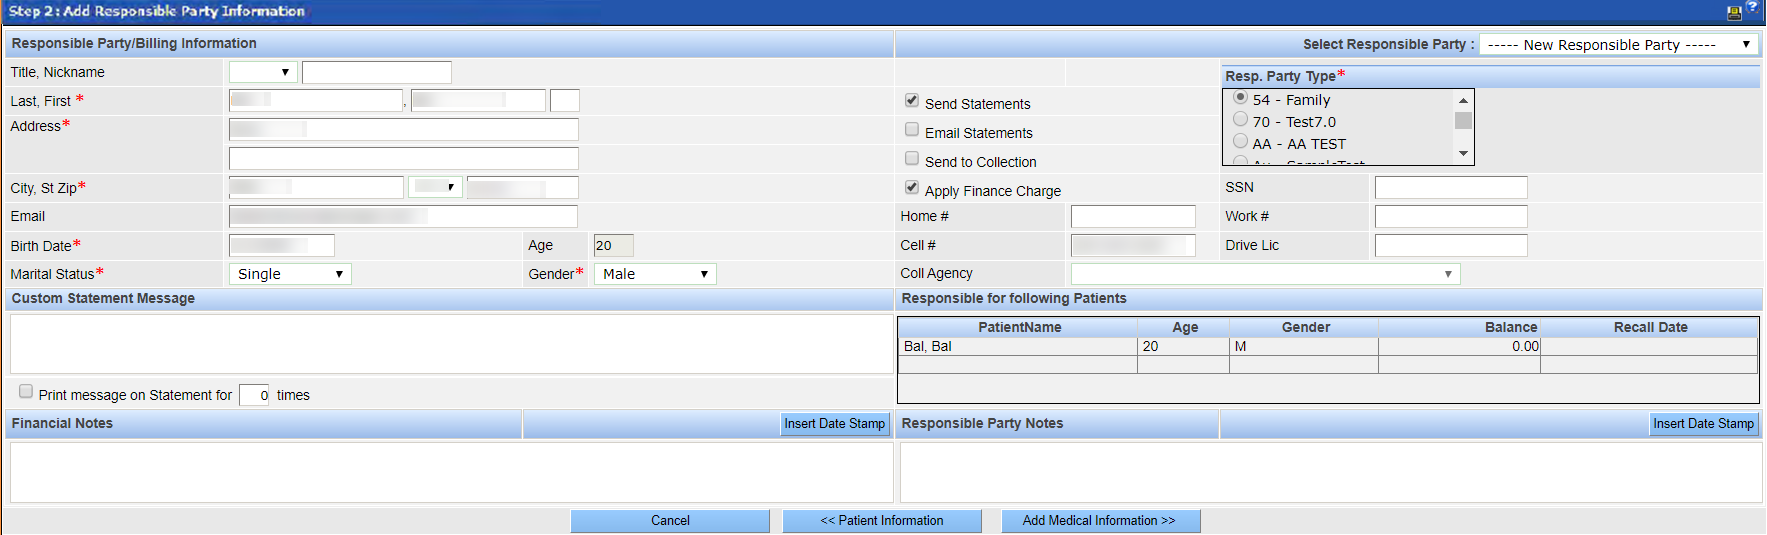 Note: When you complete this step, a permanent patient ID is created.
 -
Complete the registration by entering the values on the following windows:
- Step 3 : Add Primary Dental Plan. See Add Primary Dental Plan for more information.
- Medical Information. See Medical Information for more information.
Schedule Appointments for Existing Patients
You can use schedule appointments for existing patients.
-
On the Patient Overview window, click the New
Appt button.
The Daily View window opens, displaying all the providers and operatories.
-
Select Existing Patient.
New Appointment window opens.
- Perform a basic search, and select the desired patient.
-
Click Add.
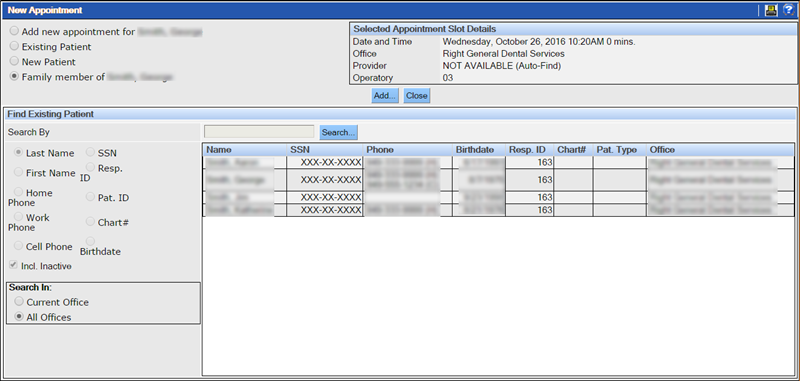
The Appointment Intake Form window opens in the Add/Edit Appointment window.
- Add the details in the Appointment Intake Form.
-
Click Save.
Note: If the patient has more than one appointment in a day, then the same Appointment Intake Form is used for all the appointments.
-
To send an email with the appointment intake form to the patient, select the
Email Intake Form.
Note: For sending emails to patients, you must have enabled Email Health History Link on the Scheduler window.
Note: An email is automatically sent to the patient to confirm the appointment even if the intake form is not filled.
-
On the Add/Edit Appointment window, enter the details of the
appointment.
 Note: To link or delink a referral for the patient, click
 next to the
Referred By field.
next to the
Referred By field. -
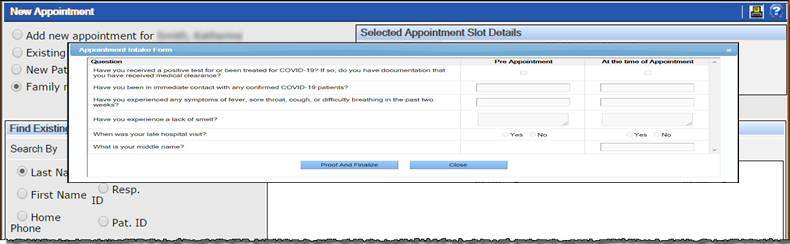
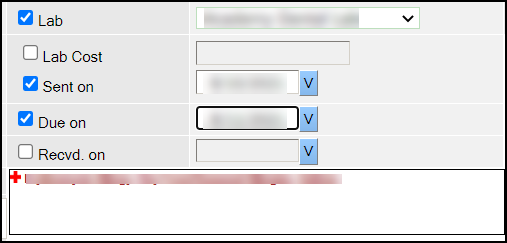
To enter the lab details, do the following:
- To associate a lab case with the appointment, select the Lab check box, and then select the lab from the list.
- To enter the lab cost, select the Lab Cost check box, and type the value in the corresponding field.
- To enter the date when the lab received the case, the due date of the products, and the date when you received the product, select the respective check box, and enter the values in the corresponding fields. If you do not know the details, you can enter these details later on the Lab Cases window.
-
Click Save.

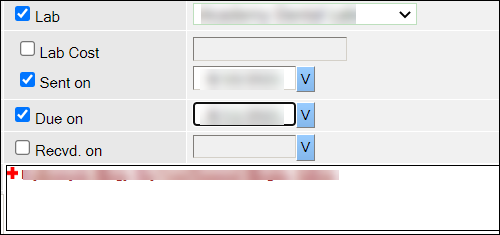
Schedule an Appointment for a Family Member of an Existing Patient
If a selected patient has family members in the system, you can schedule an appointment for one of them by taking the following steps.
To schedule an appointment for a family member of an existing patient:
- Launch the New Appointment window.
-
Select Family member of lastname, firstname.
The system displays family members of the selected patient.
- Select the desired family member.
-
Click Add.
The Add/Edit Appointment window opens along with the Appointment Intake Form.
-
If completing the Appointment Intake Form at the time of the
appointment, click Save. You must save the Add/Edit
Appointment window to save the details of the Appointment Intake
Form.
Note:
- If the patient has more than one appointment in a day, then the same Appointment Intake Form is used for all the appointments.
- If the first column of the Appointment Intake Form is filled for a confirmed appointment, then the Appointment Intake Form is displayed on the patient’s chart only on the day of the appointment.
-
If the appointment intake form is not completed, select Email Intake
Form to send an email with the appointment intake form to the patient. The
appointment intake form is sent through the health history link. To send emails to
patients, the health history link must be enabled.
Note: If E-mail patient when appointment is confirmed and intake form is not filled is selected while creating the appointment intake form, then an email is automatically sent to the patient when the intake form is not filled and the appointment is confirmed.
- Complete the necessary information for the appointment in the Add/Edit Appointment window, including duration, production type and provider.
-
If there is a lab case associated with the appointment, select the Lab
check box and then select the appropriate lab from the list. If you already
know the lab cost, the date the lab case was sent to the lab, the date the products were
due or when they were received, you can select the appropriate check boxes next to those
fields and supply values for them. If you do not have that information, you can update
this information later on the Lab Cases screen. See Overview of Lab
Cases for details.
- Add the associated treatments if desired. See Including Treatment Items in an Appointment for more information.
- Click Save.
Appointment Options
In some cases, the patient's desired appointment may cross the provider's scheduled hours (opening, closing or lunch). An appointment may still be scheduled during these "closed" hours. When the time or duration is selected such that the appointment extends into the closed hours, a popup window appears.
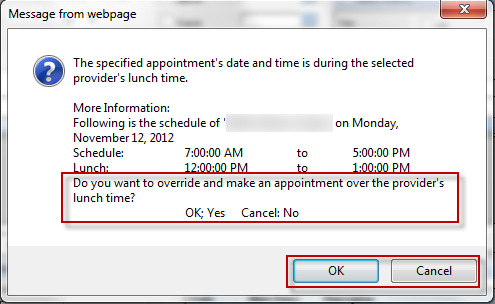
- To override the provider's normal scheduled hours and create the appointment, click OK.
-
To select a new appointment time within the provider's normal scheduled hours, click
Cancel.
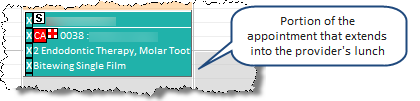
Once the appointment appears in the Scheduler, the portion of the appointment that extends into the off hours can be seen using the Scheduler's color coding. No other notation indicates the appointment is outside the provider's normal schedule.
Send Forms Using the Email Health History Link
You can send online registration forms and consent forms using the email health history link.
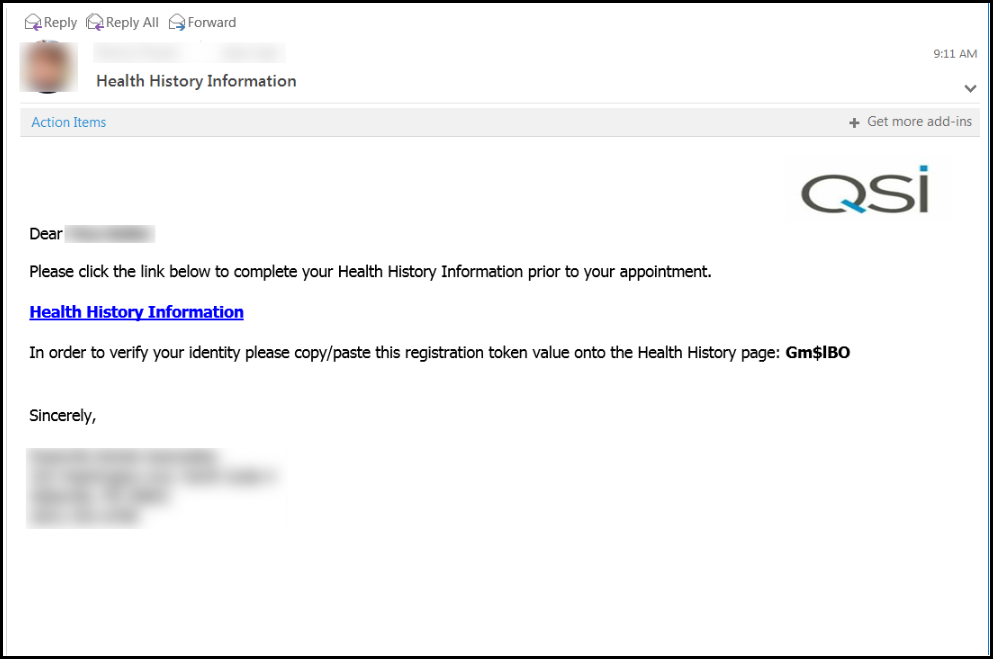
The Health History Link feature enables you to email a new or existing patient an online health history form. The patient can enter their own demographic, medical and dental information by checking the yes/no option in the checkbox. This form also provides insurance information in a read-only view. The email containing the Health History Link has a token that the recipient enters to access the health history information.
The patient is requested to enter all the required information in the health history form. To submit the form, electronic signature of the patient is required. This information is then updated medical history and the patient's signature.
The Email Health History Link is available in the Scheduler and Patient menus.
New and existing patients also have the option to submit a request for a health history link through the practice website. The patients successfully validated by the system automatically receive the health history link.
-
On the Scheduler window, right-click the patient's
appointment.
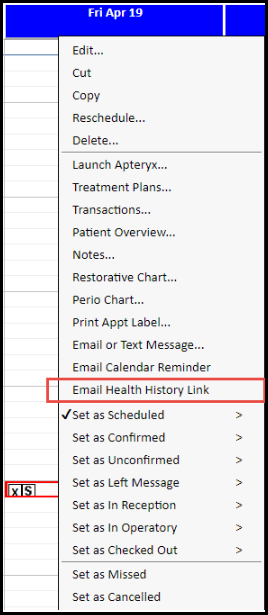
-
Click Email Health History Link.
If the patient does not have an email updated in the record, the Email Health History Link option is not enabled.Note: Patients who are 18 or older only receive the Health History Link. The application uses the responsible party's email id for younger patients.A link and secure token ID is emailed to the email address.The patient clicks the link in the email and copies the registration token to paste into the secure form.
 QSI application verifies the patient's identity by validating the date of birth and the registration token from the email. They then click Continue.
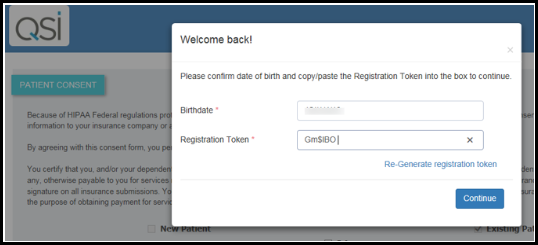 The online registration form opens and the patient reviews the existing information and enters additional information as needed. The sections on this form include:
- Patient InformationNote: A patient can view or edit the personal information depending on whether the Allow existing patient to edit demographic information checkbox has been selected in the Online Registration tab of Account Info.
- Insurance Information
- Medical Alerts
- Dental Questionnaire
- Medical Questionnaire
- ConsentNote: This section is available only when you set a frequency for the consent forms by the patient or responsible party in Form Tracking for a particular office. See, Tracking Forms for more information.
After the patient completes the information in all the sections and clicks Continue, the Patient Signature window for the consent forms that have been set for an office opens. When the patient digitally signs and clicks Accept and Sign, the patient signature window opens for the next available consent form.
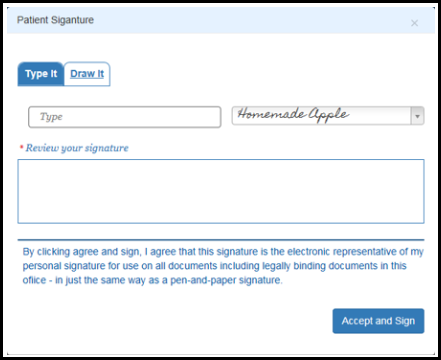 When the patient clicks Accept and Sign, these consent forms are added to the Notes section.
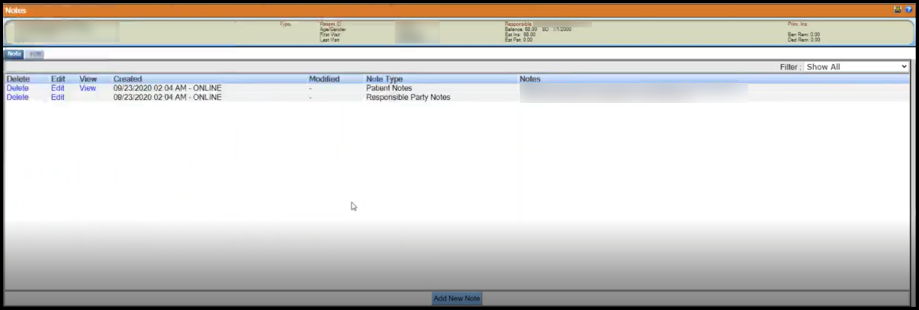 Note: If a consent form that has been set in Form Tracking is not signed, then an exclamation mark appears in the Patient Information section or Responsible Party section depending on whom the consent letter was addressed to while creating.Clicking the exclamation mark opens the Patient Consent Letter(s) window, where you have the option to email the unsigned consent forms to the patient or responsible party for signature.
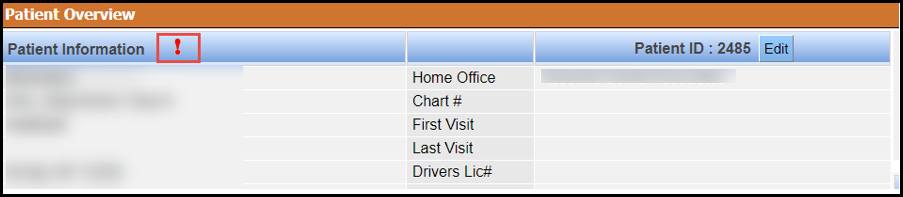

A message then appears indicating that the patient form has been successfully updated.
- Patient Information
-
After the patient accepts and signs the form,
Questionnaire appears under Medical
Alerts on the Patient Overview window. When
you point to Questionnaire, a tooltip indicates that the
patient has filled in the questionnaires. Click Medical
Alerts to view the details.