Scan and Index EOBs
EOB Statements scanned into the EOB Utility can be viewed and associated with payments and claims.
Scan EOB Statements
To scan EOB Statements into the Scan EOB Utility:
-
Click the Scan New button in the upper right corner.

-
Enter the specific details for the scan as desired.

- Enter the file name in the EOB File Name field.
- Enter a description in the Description field.
- Accept the current date as the default, or type a new date in the Scan Date field.
- Enter the total insurance payments represented by the EOB in the Amount field.
-
Place the EOB on the scanner and click the Scan button.

-
If required, place any additional EOBs on the scanner and click the Acquire
more button.

-
Repeat until all EOBs have been scanned, then click the Save
button.
A new EOB File appears as a line item in the Scan EOB module.
Index a Scanned EOB File
Once a set of EOB statements has been scanned into a file, they can be indexed to be associated with the patients. This can be accomplished for all pages at once in the Scan EOB module or by individual patient when working with a single insurance payment. To index a file in the Scan EOB module:
-
Locate the desired file and click the Add/View Index link.

-
Click the ... button to locate the patient represented by the
first EOB.
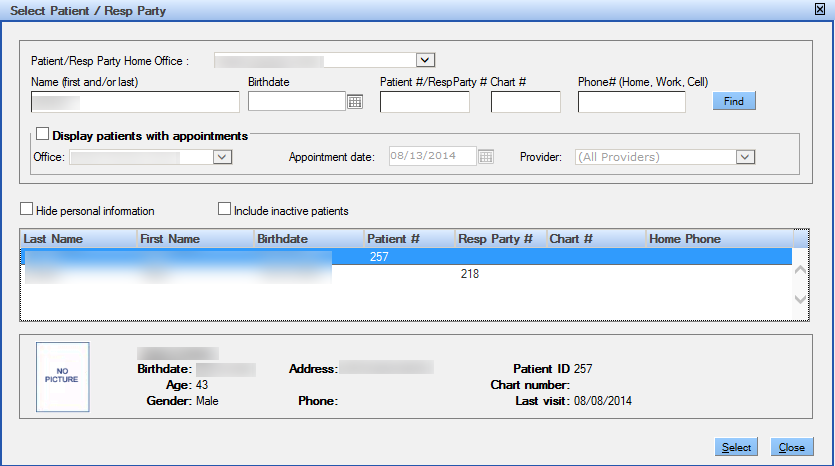
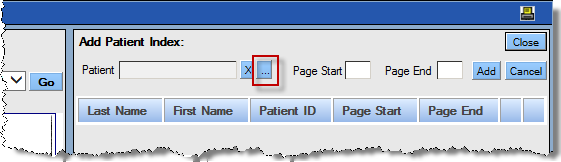 Note: The search window is similar to the Select Patient tool.
 -
Enter the desired criteria in the search field and click the
Find button. Select the patient and click the
Select button.
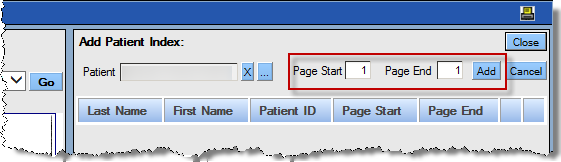
- Enter the page number that represents the first page for this patient in the Page Start field. Enter the page number that represents the last page for this patient in the Page End field.
-
Click the Add button.
-
Advance the scanned pages as needed and repeat until all pages have been indexed, then
click the Close button.
Note: Scanned EOB files may also be associated with single insurance payments as they are entered.