Create Statements
To create statements:
- Set the statement options, which include who should receive statements and what they should contain. For more information see Statement Options
- Statement date
- Inclusions and Exclusions
- Messages
-
Finance charges, if desired (See Finance
Charges ).
Note: Optionally, click Print Statement Report.
- Validate the accounts to confirm the list of accounts receiving statements is correct and identify unusual accounts.
- Make any adjustments to the accounts identified as having an unusual balance or patient/insurance breakdown.
- Repeat as needed until the statement criteria and accounts are validated as prepared for statements
- Generate and transmit the statements according to practice policies. See Transmission Options.
- Click Update Stmt Dates to lock the accounts and place the line item in the ledger of the accounts that received statements.
Statement Options
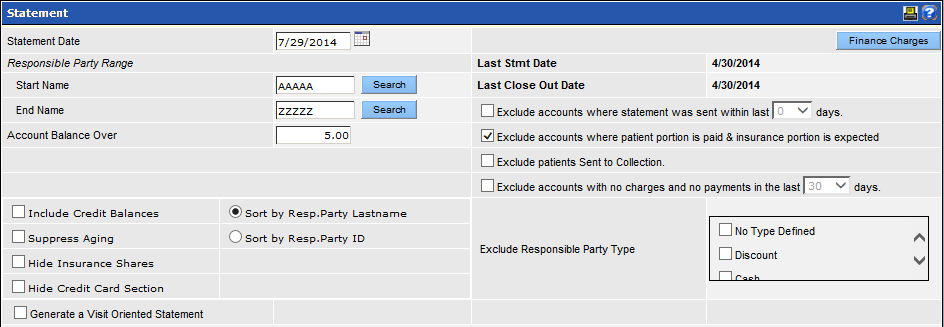
Statement Date: Set the date that should be printed on the Statement and set as the last statement date.
Hint: Typically, this date is set as the last day of the month, and is at least one day prior to the generation of the statements.
Responsible Party Range: Statements can be sent to a focused group of responsible parties defined by last name and managed alphabetically. By default, statements would be sent to all responsible parties whose last name falls within the range of AAAAA to ZZZZZ—in other words, all responsible parties. That range may be manually adjusted if required.
- Type an alternate beginning string or ending string. For example, a large practice might run the statements for the first half of the alphabet on one day and the second half another day. To accomplish this, the user would replace ZZZZZ with LZZZZZ for the first round and on the second round, replace the beginning range with MAAAA and the ending range with ZZZZZ.
- A search button allows a user to locate a specific name rather than using the character string, though few practices use this tool.

Account Balance Over: Statements can be limited to accounts that have more than a specific balance. Set this limit by typing the minimum balance. For example, if the Account Balance Over is set to $5, accounts with a balance over $5 will receive statements, while those accounts with a balance of $5 or under will not.
Include Credit Balances: Select this check box to send statements to accounts with a credit balance.
Suppress Aging: Select this check box to hide the section displaying the balance with aging levels.

Hide Insurance Shares: Select this check box to hide the section displaying the estimated insurance portion of the balance. Please be aware that the insurance portion appears to be assigned to the patient.

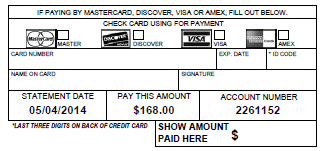
Hide Credit Card Section: Select this check box to hide the pay by credit card section.
Sort By: Set the order in which the accounts will be listed in the statement report and the order in which the statements will ultimately be generated.
- Responsible Party ID (Resp. ID): The ID # set by QSIDental Web to identify the responsible party associated with the account.
- Responsible Party Name (Resp. Party): The last and first name of the responsible party associated with the account.
Generate a Visit Oriented Statement: Select this check box to organize the statement by visit. The transactions are grouped by date of service and identified by provider name. When selected, the visit oriented statement offers additional options:

Include Provider Phone: Include the provider’s phone number in the visit header. The phone number comes from the Provider Information under the Setup Providers tool.
Exclude accounts with new balances created within last X days: Select this check box if accounts should not receive statements for recent visits. The specifics of how recent a visit can be selected via the dropdown.
Exclude accounts where statement was sent within last X days: Select this check box if accounts should not receive a statement because on was sent within a specific time period. The specifics of how recent a visit can be selected via the dropdown.
Exclude accounts where patient portion is paid & insurance portion is expected: Select this check box to prevent accounts from receiving statements if there is only an insurance balance.
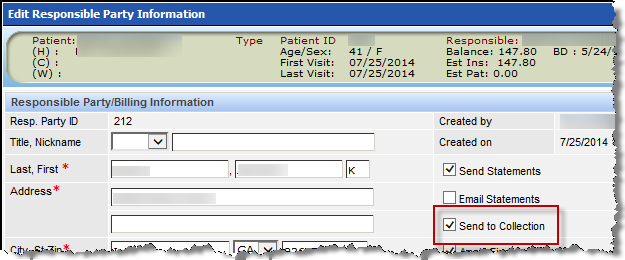
Exclude patients Sent to Collection: Select this check box to prevent accounts that are already in the collection process from receiving a statement.Accounts are considered “Sent to Collection” when the Sent to Collection check box is selected on the Responsible Party screen. Please note that this is not the same as using a Collections Responsible Party Type.
Exclude accounts with no charges and no payments in the last X days: Select this check box to prevent accounts that have had no activity (charges and payments) within a specific time period. The specifics of that time period can be selected via the dropdown.
Exclude Responsible Party Type: Responsible Party types describe or categorize responsible parties in a way that is useful to the practice. Specific responsible party types may be excluded from receiving statements. Select the responsible party types that should not receive statements.
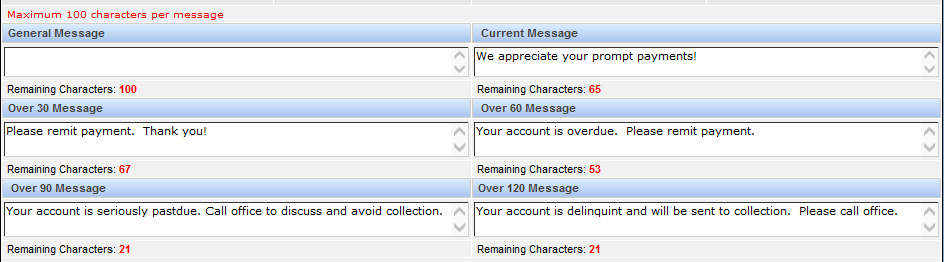
Statement Messages: Specific messages may be included at the bottom of the statement. The practice may have preset messages established in setup for accounts of different ages. However, a specific message can be customized for a specific statement run. Type the message as desired.
Finance Charges
Finance charges may be applied to accounts based on the practice preferences. To work with finance charges, click Finance Charges.
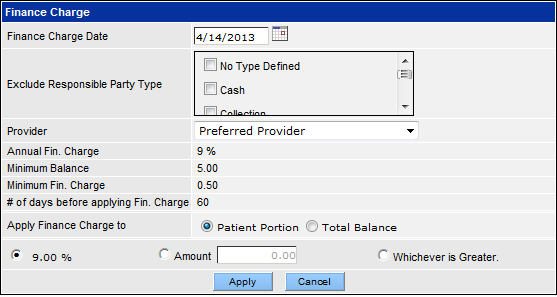
Finance Charge Date: Set the date on which the finance charges will be calculated and applied.
Exclude Responsible Party Type: Responsible Party types describe or categorize responsible parties in a way that is useful to the practice. Specific responsible party types may be not be charged the finance charges. Select the responsible party types that should not have a finance charge applied.
Provider: Set the provider that should be associated with the finance charge.
Finance Charge details: Established in settings in Office Setup (Setup tab) and cannot be edited here.
Apply Finance Charge to: Select Patient Portion to calculate the finance charge based only on the patient portion. Select Total Balance to calculate the finance charge on the entire balance.
The finance charge may be limited to a specific dollar amount or to the percentage established for the office. Select the radio button beside the percentage to apply the percentage. Select the radio button beside Amount and type the amount to apply a dollar figure as a finance charge.Select the radio button beside Whichever is Greater to apply the larger amount—the calculation based on the percentage or the fixed dollar amount.
Click Apply to apply a finance charge to the accounts that will receive statements.
Transmission Options
Once all criteria for the statements are set and all the exclusions determined, they must be generated so that patients may receive them. The available options depend on the practice’s use of EDI or other subscription options, the settings in the Account Permissions tool, and the individual user’s security rights. Please contact support or inside sales for details.
Print Statements

Click this button to manually print the statements. A PDF file will open to allow the user to save ordirectly print the statements on the default printer within the office. These statements will need to be processed and mailed by the office staff.
Send Statements

Click this button to transmit the statements to EDI for processing.EDI will print, process and mail the statements on behalf of the practice.
Download Statements

Click this button to download an XML file directly to the user’s local machine for transmission, saving or processing with a third party vendor.
Export Statements
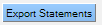
Click this button to export an XML file directly to the location or folder specified for daily reports for transmission, saving, or processing with a third party vendor.
Update Statement Dates

The date of the most recent statement generation is included in the upper-right corner of the statement screen. This date provides information about the last time statements were sent and accounts locked.
This date is not updated automatically; instead, a user must click the button to update the date. This is a manual process because setting the statement date has additional effects:
- All ledger data prior to and including the statement date will be locked and cannot be edited.
- A Statement Sentline item is placed in the ledgers of patients who receive them.
When all business is concluded for the time period and the statements are generated and transmitted as desired, click Update Stmt Dates.