Previous Topic

Next Topic

Book Contents

Generate Statements Task

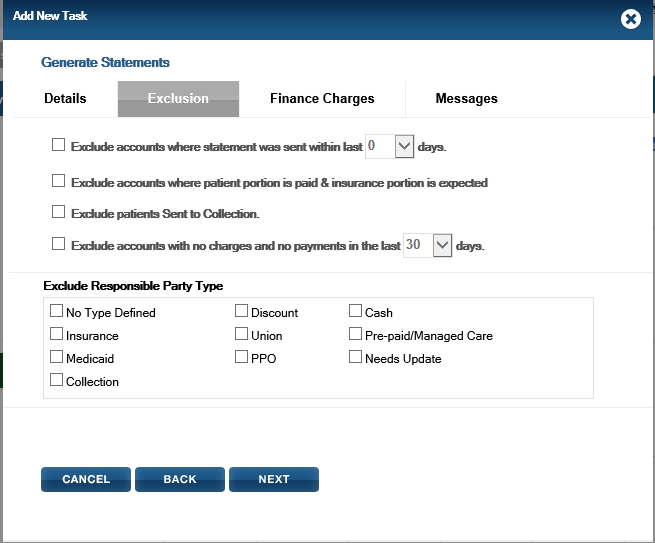
The Generate Statement task in the Task Scheduler replaces the manual process of running the Statements from the Reports menu. The user sets the options, exclusions, messages, and the process date. The Statement Options match those available when generating statements manually.

Upon the completion of the task, the statements will be generated according to the settings and automatically transmitted to EDI or downloaded based on the account settings.  The Statement Report will be provided to the user via the Tickler upon completion.  However, there is no opportunity to review the Statement Report prior to transmission.

  1. Click the Add New Task button.
  2. Select Generate Statements from the Add New Task window.

  3. Complete the fields on the Details Tab of the Generate Statements window.

  4. Click the Next button.

  5. Select the accounts that should NOT receive statements from the Exclusions tab of the Generate Statements window.

  6. Click the Next button.

  7. Set the Finance Charges if desired.

  8. Click the Next button.  

  9. Set the messages that should appear on the Statement. If no message is set, the practice and office defaults will apply.

  10. Click the Next button.  

  11. Select the office(s) whose patients should receive statements.

  12. Click the Next button.
  13. Type a name for the task. This name appears in the task panels and within the scheduler view.

  14. Select a color for the task from the dropdown. This color will be displayed for the task within the scheduler view. Many practices will set guidelines for color-coding tasks.

  15. Set the interval for the task to be performed

    Note: The selection made here will trigger the frequency options at the bottom of the window.

  16. Set the date that QSIDental Web should begin performing the task by typing the date or selecting it from the calendar. The begin date does not need to correspond to the frequency cycle.

  17. Set the date that QSIDental Web should discontinue performing the task by typing the date or selecting it from the calendar.

    Note: This option only appears when a frequency interval is selected.

  18. Set the time that the task should begin by typing the time directly or selecting from the clock dropdown.

  19. Set the Frequency options for Daily, Weekly, or Monthly performance of the task. (Triggered based on the selection made for interval and dependent on that selected interval)

    Daily

    The task may be performed every day or on alternate days as specified

    To perform the task every single day, select the radio button beside Every Day

    To perform the task on a regular daily interval, select the radio button beside Every  x days and choose the specific interval from the dropdown.

    For example: To run the collection letters every other day, click the radio button beside Every X days and select 2 from the dropdown.

    Weekly

    The task may be performed one or more times per week on certain days as specified.

    Select the number of weeks between the performance of the tasks.  Selecting “1” will set the task to be performed each week. Selecting “3” will set the task to be performed every third week.

    Select the day(s) of the week the task should be performed during the scheduled weeks by placing a check mark beside the desired day(s) of the week.

    For example: To run the collection letters on alternate Wednesdays, select 2 in the Recur Every field and select Wednesday from the Weeks on field.


    Monthly

    The task may performed on a specific date or day as specified.


    To perform the task on a specific day of the month, select the radio button beside Day and select the specific date. To manage different month lengths, “Last day of the month” may be selected.

    To perform the task on a specific day of the week, select the radio button beside The X weekday and set the specific cycle within the month such as 2nd Friday.

    Select the month(s) the task should be performed during the year by placing a check mark beside the desired month(s).

    For example: To run the collection letters on the 15th of the month ending the quarter, select the radio button beside Day and select 15.  Place check marks in the months of March, June, September, and December.

  20. If desired, place a check mark beside Send Task Completion Notification via Email to activate the confirmation email options. This notification is in addition to the task completion notice and report delivered via the QSIDental Web Tickler tool.  The notification is only of the successful or unsuccessful completion of the task and does not contain any data.
  21. Click the Next button.
  22. If Completion Notification was selected, identify the individual(s) that should receive notification that the task as been completed by typing the email address(es). Once the email address is entered, it will be saved for easy future use. Click the Next button again.  

    Note: This window will not appear if notification is not requested on the previous window.

  23. Review the details and click the Finish button.

See Also

Task Scheduler

Getting Oriented in the Task Scheduler

Creating and Managing Tasks in the Scheduler

Schedule Collection Letters Task

Schedule the Regular Payment Plan Charges Task

Schedule the Ortho Payment Plan Charges Task

Schedule the Batch Claims Task

Schedule the 835 Auto Posting Task

Generate Reports Task