Enter Pocket Depth Data
To enter pocket depth data:
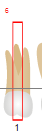
- Click the numerical button that represents the measurement for the first pocket of the first tooth indicated with the red box. Once a number button is clicked, the prompt will advance automatically to the next pocket.

- Click the numerical button that represents the measurement for the second pocket of the first tooth indicated with the red box. Once a number is selected, the prompt will advance automatically to the next pocket.
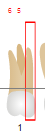
- Click the numerical button that represents the measurement for the third pocket of the first tooth indicated with the red box. Once a number is selected, the prompt will advance automatically to the next pocket.
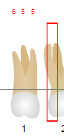
- Click the numerical button that represents the measurement for the first pocket of the second tooth indicated with the red box.
- Repeat for all pockets and all teeth.

To add a measurement greater than 10, click the +10 button and the button for the “ones” number. Click the button again to release the +10 measurement. Measurements greater than 10 will display with a subscript.
Hint: It is easy to forget that the +10 toggle is on. Watch the entries that indicate the +10.


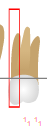
As exam findings are entered, the numbers appear above or below the pocket for the appropriate measurement. Measurements greater than 10 use a superscript to display the full measurement.
In addition to the onwindow and mouse method of entering data, exam findings may be entered using the keyboard. In the keyboard method, use the number keys on the keyboard to enter the pocket depth measurement.