![]()
![]()
![]()
![]()
|
|
|
|
|
Step 2 of adding a procedure code involves specifying how the procedure appears in the charts as well as entering smart-code settings. These are not required for uncharted procedures.
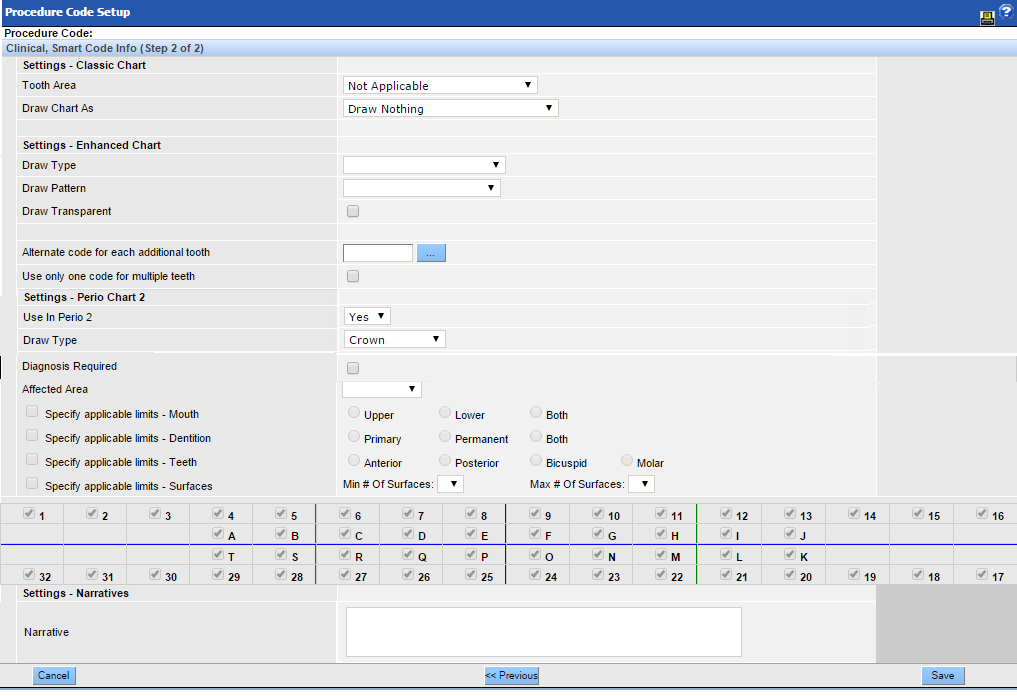
Settings – Classic Chart: The classic chart is no longer used and these settings no longer apply.
Settings Enhanced Chart: Select the desired options from the dropdown to indicate how the procedure should be drawn on the chart.
Alternate code for each additional tooth: When multiple teeth are involved in a procedure, sometimes the subsequent teeth are given different procedure codes than the first tooth. Search for and select the code that would be used for additional teeth involved in this procedure.
Use only one code for multiple teeth: Select this checkbox to use the code only once regardless of the number of teeth selected. Typically used for procedures involving the full mouth such as hygiene or sealants.
Settings - Perio Chart 2: When the Perio 2 chart is enabled, use these settings to indicate that this procedure should be available for adding within the Perio 2 module. Select the desired draw type from the picklist. Options include: Impacted, Extracted/Missing, Crown, and Bridge Pontic. If there are no options in the picklist for the Draw Type field, a Condition or Service code has already been selected for that button in the Perio 2 module.
Diagnosis Required: Click this checkbox to require the user to enter an ICD code when entering this service into the chart. The Diagnosis Code window will appear automatically for the user. Procedures mapped to ICD codes using the Procedure to ICD crosscoder will display the established codes by default, though any code added into QSIDental Web will be available.
Affected Area: Selections in this section improve the smart logic –matching the surfaces and teeth to the specific procedure code.
Select the area of the mouth from the dropdown. The selection here will enable or disable the sections below.
Select the checkbox to activate and set specific limits for the procedure code and enable the logic for a specific oral area –teeth, mouth, dentition, and/or surfaces. Click the desired radio button to select specifics.
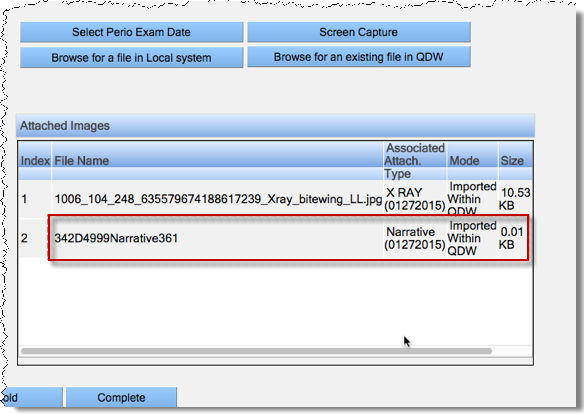
Narrative: Type any description, notes, or details that should automatically appear when the procedure code is associated with an automatic NEA Attachment. This information will appear on the Narrative tab when the code is saved. Please note that the narrative text itself is not visible in QSIDental Web, but the NEA screens will indicate the narrative and it will be included in the transmission.